Wednesday, November 27, 2024

Amazon FSx for Lustre increases throughput to GPU instances by up to 15x

Today, we are announcing support for Elastic Fabric Adapter (EFA) and NVIDIA GPUDirect Storage (GDS) on Amazon FSx for Lustre. EFA is a network interface for Amazon EC2 instances that makes it possible to run applications requiring high levels of inter-node communications at scale. GDS is a technology that creates a direct data path between local or remote storage and GPU memory. With these enhancements, Amazon FSx for Lustre with EFA/GDS support provides up to 15 times higher (up to 1500 Gbps) per-client throughput compared to the previous FSx for Lustre version.

You can use FSx for Lustre to build and run the most performance demanding applications, such as deep learning training, drug discovery, financial modeling, and autonomous vehicle development. As datasets grow and new technologies emerge, you can adopt increasingly powerful GPU and HPC instances such as Amazon EC2 P5, Trn1, and Hpc7a. Until now, when accessing FSx for Lustre file systems, the use of traditional TCP networking limited throughput to 100 Gbps for individual client instances. This adoption is driving the need for FSx for Lustre file systems to provide the performance necessary to optimally utilize the increasing network bandwidth of these cutting-edge EC2 instances when accessing large datasets.

With EFA and GDS support in FSx for Lustre, you can now achieve up to 1,500 Gbps throughput per client instance (fifteen times more throughput than previously) when using P5 GPU instances and NVIDIA CUDA in your applications.

With this new capability, you can fully utilize the network bandwidth of the most powerful compute instances and accelerate your machine learning (ML) and HPC workloads. EFA enhances performance by bypassing the operating system and using the AWS Scalable Reliable Datagram (SRD) protocol to optimize data transfer. GDS further improves performance by enabling direct data transfer between the file system and GPU memory, bypassing the CPU and eliminating redundant memory copies.

Let’s see how this works in practice.

Creating an Amazon FSx for Lustre file system with EFA enabled
To get started, in the Amazon FSx console, I choose Create file system and then Amazon FSx for Lustre.

I enter a name for the file system. In the Deployment and storage type section, I select Persistent, SSD and the new with EFA enabled option. I select 1000 MB/s/TiB in the Throughput per unit of storage section. With these settings, I enter 4.8 TiB for Storage capacity, which is the minimum supported with these settings.

Console screenshot.

For networking, I use the default virtual private cloud (VPC) and an EFA-enabled security group. I leave all other options to their default values.

Console screenshot.

I review all the options and proceed to create the file system. After a few minutes, the file system is ready to be used.

Mounting an Amazon FSx for Lustre file system with EFA enabled from an Amazon EC2 instance
In the Amazon EC2 console, I choose Launch instance, enter a name for the instance, and select the Ubuntu Amazon Machine Image (AMI). For Instance type, I select trn1.32xlarge.

Console screenshot.

In Network settings, I edit the default settings and select the same subnet used by the FSx Lustre file system. In Firewall (security groups), I select three existing security groups: the EFA-enabled security group used by the FSx for Lustre file system, the default security group, and a security group that provides Secure Shell (SSH) access.

Console screenshot.

In Advanced network configuration, I select ENA and EFA as Interface type. Without this setting, the instance would use traditional TCP networking and the connection with the FSx for Lustre file system would still be limited to 100 Gbps in throughput.

Console screenshot.

To have more throughput, I can add more EFA network interfaces, depending on the instance type.

I launch the instance and, when the instance is ready, I connect using EC2 Instance Connect and follow the instructions for installing the Lustre client in the FSx for Lustre User Guide and configuring EFA clients.

Then, I follow the instructions for mounting an FSx for Lustre file system from an EC2 instance.

I create a folder to use as mount point:

sudo mkdir -p /fsx

I select the file system in the FSx console and lookup the DNS name and Mount name. Using these values, I mount the file system:

sudo mount -t lustre -o relatime,flock file_system_dns_name@tcp:/mountname /fsx

EFA is automatically used when you access an EFA-enabled file system from client instances that support EFA and are using Lustre version 2.15 or higher.

Things to know
EFA and GDS support is available today with no additional cost on new Amazon FSx for Lustre file systems in all AWS Regions where persistent 2 is offered. FSx for Lustre automatically uses EFA when customers access an EFA-enabled file system from client instances that support EFA, without requiring any additional configuration. For a list of EC2 client instances that support EFA, see supported instance types in the Amazon EC2 User Guide. This network specifications table describes network bandwidths and EFA support for instance types in the accelerated computing category.

To use EFA-enabled instances with FSx for Lustre file systems, you must use Lustre 2.15 clients on Ubuntu 22.04 with kernel 6.8 or higher.

Note that your client instances and your file systems must be located in the same subnet within your Amazon Virtual Private Cloud (Amazon VPC) connection.

GDS is automatically supported on EFA-enabled file systems. To use GDS with your FSx for Lustre file systems, you need the NVIDIA Compute Unified Device Architecture (CUDA) package, the open source NVIDIA driver, and the NVIDIA GPUDirect Storage Driver installed on your client instance. These packages come preinstalled on the AWS Deep Learning AMI. You can then use your CUDA-enabled application to use GPUDirect storage for data transfer between your file system and GPUs.

When planning your deployment, note that EFA-enabled file systems have larger minimum storage capacity increments than file systems that are not EFA-enabled. For instance, if you choose the 1,000 MB/s/TiB throughput tier, the minimum storage capacity for EFA-enabled file systems starts at 4.8 TiB as compared to 1.2TB for FSx for Lustre file systems not enabling EFA. If you’re looking to migrate your existing workloads, you can use AWS DataSync to move your data from an existing file system to a new one that supports EFA and GDS.

For maximum flexibility, FSx for Lustre maintains compatibility with both EFA and non-EFA workloads. When accessing an EFA-enabled file system, traffic from non-EFA client instances automatically flows over traditional TCP/IP networking using Elastic Network Adapter (ENA), allowing seamless access for all workloads without any additional configuration.

To learn more about EFA and GDS support on FSx for Lustre, including detailed setup instructions and best practices, visit the Amazon FSx for Lustre documentation. Get started today and experience the fastest storage performance available for your GPU instances in the cloud.

Danilo


from AWS News Blog https://ift.tt/XLKx3sM
via IFTTT

Exploring Amazon Vendor Central Direct Fulfillment

Amazon Vendor Central Direct Fulfillment is an effective drop ship program that allows vendors to ship products directly to customers on Amazon's behalf.

This guide will provide an in-depth overview of managing orders in Amazon Vendor Central, covering everything from onboarding to effectively handling bulk shipments. Whether you’re just getting started or looking to refine your processes, this comprehensive post will guide you through the core features of Direct Fulfillment.

Key Differences in Managing Direct Fulfillment Orders

One significant difference between direct fulfillment and traditional fulfillment by Amazon (FBA) is the prep work for each ASIN. Unlike FBA, where products are sent to Amazon’s fulfillment centers in bulk, Direct Fulfillment requires individual packing, and vendors need to apply specific labels to each package.

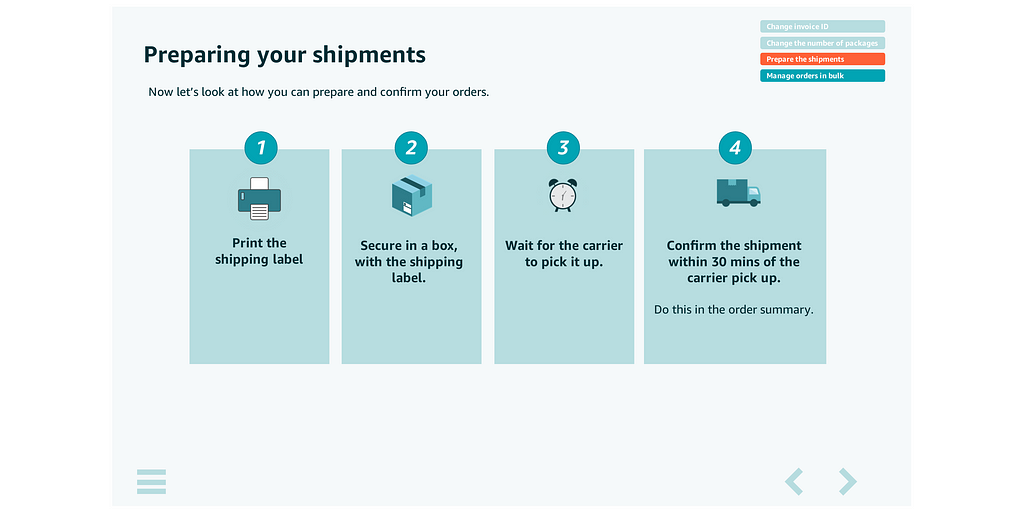
Additionally, Direct Fulfillment requires confirming the order right after the carrier picks it up, ensuring Amazon and the customer are notified immediately about the shipment’s progress.

What is Amazon’s Direct Fulfillment program for?

This program is designed for vendors onboarded into Amazon’s Direct Fulfillment program. Direct Fulfillment is Amazon’s drop-ship model, where vendors pack and ship products directly to customers rather than sending stock to Amazon’s fulfillment centers.

If you haven’t been onboarded onto Direct Fulfillment yet, Amazon offers a separate training called What Direct Fulfillment? in the Vendor Central Training Center. This training provides essential insights into the program and its benefits.

Critical Tasks in Order Management

Managing orders in Vendor Central involves a few essential tasks to ensure a smooth fulfillment process. These include:

  • Changing the Invoice ID: Vendors may need to update the invoice ID to avoid confusion with internal accounting systems. You must note that you can only do this before shipping the item.
  • Changing the Number of Packages to be Shipped: Sometimes, an order may need to be adjusted based on packaging requirements.
  • Preparing Shipments: Ensuring all items are packed properly with appropriate labels.
  • Managing Orders in Bulk: Efficiently managing multiple orders using spreadsheets.

We’ll dive into the specifics of these tasks to help you manage your orders more effectively.

Changing the Invoice ID

To change the invoice ID in Vendor Central, follow these steps:

  • Select “Update with Spreadsheet”: At the top of the Customer Orders page, click on “Update with Spreadsheet.”
  • Download and Edit the Spreadsheet**: Select the appropriate warehouse and download the shipments template file. Once downloaded, modify the **Order ID** column in Excel, ensuring that the correct ID is used for your records.
  • Upload the Updated Spreadsheet**: Save the edited file and upload it back to Vendor Central using the “Browse for updated file” button.

What Happens If You Don’t Ship Within the Required Ship Date?

Timeliness is crucial in Direct Fulfillment. If you fail to ship an order within the required ship date, Amazon grants a grace period of 7 days to confirm the shipment of the item.

Failure to meet this deadline will automatically cancel the order. In this case, a chargeback will be issued, and you cannot invoice the item.

Accessing Your Orders

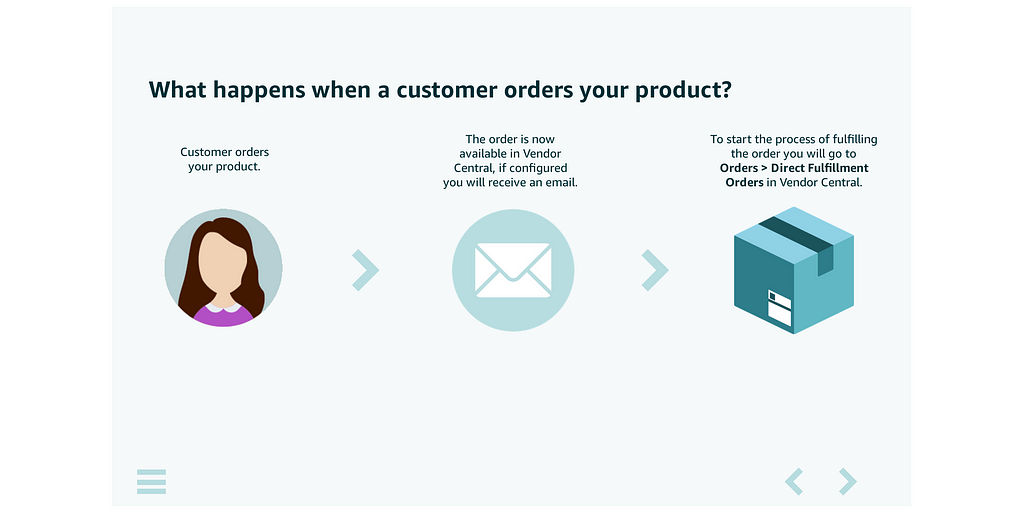
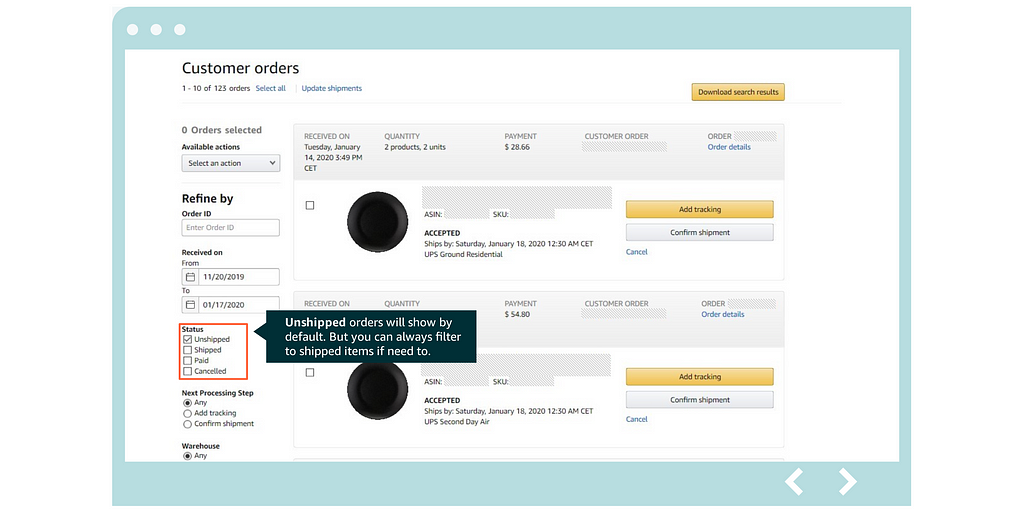
To access your Direct Fulfillment orders in Vendor Central, go to: Orders > Direct Fulfillment Orders

You can view both unshipped and shipped orders. By default, unshipped orders will be displayed, but you can filter to show shipped items if needed.

Receiving Orders

Orders received through Direct Fulfillment include detailed information on the latest shipping date and time. This information can be viewed under the “Expected Ship Date (ExSD)” and “Ship Method (SM).” It’s essential to note these details to avoid any delays or penalties.

Managing Orders in Bulk

Direct Fulfillment allows for bulk order management through spreadsheet updates, making it easier for vendors to process multiple shipments simultaneously. To manage orders in bulk:

  • Download the Shipment Template: This template helps update all the relevant information for multiple orders.
  • Edit Shipment Details: Fill in details like tracking numbers, package contents, etc.
  • Submit the Spreadsheet: Upload the updated spreadsheet to Vendor Central to apply the changes.
    Vendor Central Direct Fulfillment is a powerful tool for vendors who want to take control of the shipping process while leveraging Amazon’s vast reach. Staying proactive and detail-oriented with each order will lead to a smoother fulfillment experience, better customer satisfaction, and a strong partnership with Amazon.

For more information on the Amazon technical documentation for Vendor Central, see start with the SP-API Vendor Direct Fulfillment guide.

Unlock Effortless Data Management With Our Code-Free Amazon Vendor Central Integration

Amazon vendors can spend a lot of time and effort manually processing their data. Say goodbye to the hassle.

Openbridge automation will automatically collect, process, route, and load your Vendor Central data to a private destination.

Openbridge offers a seamless, automated solution that unifies your data into a private, trusted data warehouse or data lake like Amazon Redshift, Snowflake, Databricks, Google BigQuery, and more — all without a single line of code.

Why Choose Openbridge?

  • Automate with Ease: Skip the manual report downloads and enjoy automated data feeds directly into your private cloud data warehouse or data lake.
  • Data-Driven Insights: Leverage high-velocity data for machine learning, business intelligence, and more.
  • Versatile Compatibility: Works effortlessly with Google Data Studio, Tableau, Microsoft Power BI, and other tools.

Openbridge automation extends beyond inventory to a broad collection of Amazon and non-Amazon data sources;

Automate And Unify Your Vendor Central Data — Free For 30 Days

Start your journey towards data-driven growth and profit with Openbridge. Our code-free, fully automated Selling Partner API integration simplifies your Vendor Central operations.

Ready to harness the power of your Vendor Central data?

Sign Up Now for Your Free 30-day Trial For Amazon Vendor Central Automation.


Exploring Amazon Vendor Central Direct Fulfillment was originally published in Openbridge on Medium, where people are continuing the conversation by highlighting and responding to this story.


from Openbridge - Medium https://ift.tt/c4yxhQv
via Openbridge

Tuesday, November 26, 2024

Time-based snapshot copy for Amazon EBS

You can now specify a desired completion duration (15 minutes to 48 hours) when you copy an Amazon Elastic Block Store (Amazon EBS) snapshot within or between AWS Regions and/or accounts. This will help you to meet time-based compliance and business requirements for critical workloads. For example:

Testing – Distribute fresh data on a timely basis as part of your Test Data Management (TDM) plan.

Development – Provide your developers with updated snapshot data on a regular and frequent basis.

Disaster Recovery – Ensure that critical snapshots are copied in order to meet a Recovery Point Objective (RPO).

Regardless of your use case, this new feature gives you consistent and predictable copies. This does not affect the performance or reliability of standard copies—you can choose the option and timing that works best for each situation.

Creating a Time-Based Snapshot Copy
I can create time-based snapshot copies from the AWS Management Console, CLI (copy-snapshot), or API (CopySnapshot). While working on this post I created two EBS volumes (100 GiB and 1 TiB), filled each one with files, and created snapshots:

To create a time-based snapshot, I select the source as usual and choose Copy snapshot from the Action menu. I enter a description for the copy, choose the us-east-1 AWS Region as the destination, select Enable time-based copy, and (because this is a time-critical snapshot), enter a 15 minute Completion duration:

When I click Copy snapshot, the request will be accepted (and the copy will become Pending) only if my account’s throughput quotas are not already exceeded due to the throughput consumed by other active copies that I am making to the destination region. If the account level throughput quota is already exceeded, the console will display an error.

I can click Launch copy duration calculator to get a better idea of the minimum achievable copy duration for the snapshot. I open the calculator, enter my account’s throughput limit, and choose an evaluation period:

The calculator then uses historical data collected over the course of previous snapshot copies to tell me the minimum achievable completion duration. In this example I copied 1,800,000 MiB in the last 24 hours; with time-based copy and my current account throughput quota of 2000 MiB/second I can copy this much data in 15 minutes.

While the copy is in progress, I can monitor progress using the console or by calling DescribeSnapshots and examining the progress field of the result. I can also use the following Amazon EventBridge events to take actions (if the copy operation crosses regions, the event is sent in the destination region):

copySnapshot – Sent after the copy operation completes.

copyMissedCompletionDuration – Sent if the copy is still pending when the deadline has passed.

Things to Know
And that’s just about all there is to it! Here’s what you need to know about time-based snapshot copies:

CloudWatch Metrics – The SnapshotCopyBytesTransferred metric is emitted in the destination region, and reflect the amount of data transferred between the source and destination region in bytes.

Duration – The duration can range from 15 minutes to 48 hours in 15 minute increments, and is specified on a per-copy basis.

Concurrency – If a snapshot is being copied and I initiate a second copy of the same snapshot to the same destination, the duration for the second one starts when the first one is completed.

Throughput – There is a default per-account limit of 2000 MiB/second between each source and destination pair. If you need additional throughput in order to meet your RPO you can request an increase via the AWS Support Center. Maximum per-snapshot throughput is 500 MiB/second and cannot be increased.

Pricing – Refer to the Amazon EBS Pricing page for complete pricing information.

Regions – Time-based snapshot copies are available in all AWS Regions.

Jeff;


from AWS News Blog https://ift.tt/ktHGqPv
via IFTTT

Monday, November 25, 2024

Announcing future-dated Amazon EC2 On-Demand Capacity Reservations

Customers use Amazon Elastic Compute Cloud (Amazon EC2) to run every type of workload imaginable, including web hosting, big data processing, high-performance computing (HPC), virtual desktops, live event streaming, and databases. Some of these workloads are so critical that customers asked for the ability to reserve capacity for them.

To help customers flexibly reserve capacity, we launched EC2 On-Demand Capacity Reservations (ODCRs) in 2018. Since then, customers have used capacity reservations (CRs) to run critical applications like hosting consumer websites, streaming lives sporting events and processing financial transactions.

Today, we’re announcing the ability to get capacity for future workloads using CRs. Many customers have future events such as product launches, large migrations, or end-of-year sales events like Cyber Monday or Diwali. These events are critical, and customers want to ensure they have the capacity when and where they need it.

While CRs helped customers reserve capacity for these events, they were only available just-in-time. So customers either needed to provision the capacity ahead of time and pay for it or plan with precision to provision CRs just-in-time at the start of the event.

Now you can plan and schedule your CRs up to 120 days in advance. To get started you specify the capacity you need, the start date, delivery preference, and the minimum duration you commit to use the capacity reservation. There are no upfront charges to schedule a capacity reservation. After Amazon EC2 evaluates and approves the request, it will activate the reservation on the start date, and customers can use it to immediately launch instances.

Getting started with future-dated capacity reservations
To reserve your future-dated capacity, choose Capacity Reservations on the Amazon EC2 console and select Create On-Demand Capacity Reservation, and choose Get started.

To create a capacity reservation, specify the instance type, platform, Availability Zone, platform, tenancy, and number of instances you are requesting.

future-dated-2a

In the Capacity Reservation details section, choose At a future date in the Capacity Reservation starts option and choose your start date and commitment duration.

future-dated-1a

You can also choose to end the capacity reservation at a specific time or manually. If you select Manually, the reservation has no end date. It will remain active in your account and continue to be billed until you manually cancel it. To reserve this capacity, choose Create.

future-dated-4

After you create your capacity request, it appears in the dashboard with an Assessing status. During this state, AWS systems will work to determine if your request is supportable which is usually done within 5 days. Once the systems determine the request is supportable, the status will be changed to Scheduled. In rare cases, your request may be unsupported.

On your scheduled date, the capacity reservation will change to an Active state, the total instance count will be increased to the amount requested, and you can immediately launch instances.

After activation, you must hold the reservation for at least the commitment duration. After the commitment duration elapses, you can continue to hold and use the reservation if you’d like or cancel it if no longer needed.

Things to know
Here are some things that you should know about the future-dated CRs:

  • Evaluation – Amazon EC2 considers multiple factors when evaluating your request. Along with forecasted supply, Amazon EC2 considers how long you plan to hold the capacity, how early you create the Capacity Reservation relative to your start date, and the size of your request. To improve the ability of Amazon EC2 to support your request, create your reservation at least 56 days (8 weeks) before the start date. You need to submit a request for at least 100 vCPUs for only C, M, R, T, I instance types. The recommended minimum commitment for most requests will be 14 days.
  • Notification – We recommend monitoring the status of your request through the console or Amazon EventBridge You can use these notifications to trigger automation or send an email or text update. To learn more, visit Send an email when events happen using Amazon EventBridge in the Amazon EventBridge User Guide.
  • Pricing – Future dated capacity reservations are billed just like regular CRs. It is charged at the equivalent On-Demand rate whether you run instances in reserved capacity or not. For example, if you create a future dated CR for 20 instances and run 15 instances, you will be charged for 15 active instances and for 5 unused instances in the reservation including the minimum duration. Savings Plans apply to both unused reservations and instances running on the reservation. To learn more, visit Capacity Reservation pricing and billing in the Amazon EC2 User Guide.

Now available
Future dated EC2 Capacity Reservations are now available today in all AWS Regions where Amazon EC2 Capacity Reservations are available.

Give Amazon EC2 Capacity Reservations a try in the Amazon EC2 console. To learn more, visit On-Demand Capacity Reservations in the Amazon EC2 User Guide and send feedback to AWS re:Post for Amazon EC2 or through your usual AWS Support contacts.

Channy


from AWS News Blog https://ift.tt/t60WnSX
via IFTTT

AWS Weekly Roundup: 197 new launches, AI training partnership with Anthropic, and join AWS re:Invent virtually (Nov 25, 2024)

Last week, I saw an astonishing 197 new service launches from AWS. This means we are getting closer to AWS re:Invent 2024! Our News Blog team is also finalizing blog posts for re:Invent to introduce some awesome launches from service teams for your reading pleasure.

The most interesting news is that we’re expanding our strategic collaboration with Anthropic as our primary training partner for development of our AWS Trainium chips. This is in addition to being their primary cloud provider for deploying Anthropic’s Claude models in Amazon Bedrock. We’ll keep pushing the boundaries of what customers can achieve with generarive AI technologies with these kinds of collaborations.

Last week’s launches
Here are some AWS bundled feature launches:

Amazon Aurora – Amazon Aurora Serverless v2 now supports scaling to 0 Aurora Capacity Units (ACUs). With 0 ACUs, you can now save cost during periods of database inactivity. Instead of scaling down to 0.5 ACUs, the database can now scale down to 0 ACUs. Amazon Aurora is now compatible with MySQL 8.0.39 and PostgreSQL 17.0 in the Amazon RDS Database preview environment.

Amazon Bedrock – You can quickly build and execute complex generative AI workflows without writing code with the general availability of Amazon Bedrock Flows (previously known as Prompt Flows). Amazon Bedrock Knowledge Bases now supports binary vector embeddings for building Retrieval Augmented Generation (RAG) applications. Amazon Bedrock also introduce a preview launch of Prompt Optimization to rewrite prompts for higher quality responses from foundational models (FMs). You can use AWS Amplify AI kit to easily leverage your data to get customized responses from Bedrock AI models to build web apps with AI capabilities such as chat, conversational search, and summarization.

Amazon CloudFront – You can use gRPC applications in Amazon CloudFront that allows bidirectional communication between a client and a server over HTTP/2 connections. Amazon CloudFront introduces Virtual Private Cloud (VPC) origins to deliver content from applications hosted in VPC private subnets, and Anycast Static IPs to provide you with a dedicated list of IP addresses for connecting to all CloudFront edge locations worldwide. You can also conditionally change or update origin servers on each request with origin modification within CloudFront Functions, and use new log configuration and delivery options.

Amazon CloudWatch – You can use field indexes and log transformation to improve log analytics at scale in the CloudWatch Logs. You can also use enhanced search and analytics experience and runtime metrics support with CloudWatch Application Signals, and percentile aggregation and simplified events-based troubleshooting directly from the web vitals anomaly in CloudWatch Real User Monitoring (RUM).

Amazon Cognito – You can secure user access to your applications with passwordless authentication, including sign-in with passkeys, email, and text message. Amazon Cognito introduces Managed Login, hosted sign-in and sign-up experience that customers can personalize to align with their company or application branding. Cognito launches new user pool feature tiers: Essentials and Plus as well as a new developer-focused console experience. To learn more, visit Donnie’s blog post.

Amazon Connect – You can use new customer profiles and outbound campaigns to help you proactively address customer needs before they become potential issues. Amazon Connect Contact Lens now supports creating custom dashboards, as well as adding or removing widgets from existing dashboards. With new Amazon Connect Email, you can receive and respond to emails sent by customers to business addresses or submitted via web forms on your website or mobile app.

Amazon EC2 – You can shift the launches of EC2 instances in an Auto Scaling Group (ASG) away from an impaired Availability Zone (AZ) to quickly recover your unhealthy application in another AZ with Amazon Application Recovery Controller (ARC) zonal shift and zonal autoshift. Application Load Balancer (ALB) now supports HTTP request and response header modification giving you greater controls to manage your application’s traffic and security posture without having to alter your application code.

AWS End User Messaging (aka Amazon Pinpoint) – You can now track feedback for messages sent through the SMS and MMS channel, explicitly block or allow messages to individual phone numbers overriding your country rule settings, and cost allocation tags for SMS resources to track spend for each tag associated with a resource. AWS End User Messaging also now support integration with Amazon EventBridge.

AWS Lambda – You can use Lambda SnapStart for Python and .NET functions to deliver as low as sub-second startup performance. AWS Lambda now supports Amazon S3 as a failed-event destination for asynchronous invocations and Amazon CloudWatch Application Signals to easily monitor the health and performance of serverless applications built using Lambda. You can also use a new Node.js 22 runtime and Provisioned Mode for event source mappings (ESMs) that subscribe to Apache Kafka event sources.

Amazon OpenSearch Service – You can scale a single cluster to 1000 data nodes (1000 hot nodes and/or 750 warm nodes) to manage 25 petabytes of data. Amazon OpenSearch Service introduces Custom Plugins, a new plugin management option to extend the search and analysis functions in OpenSearch.

Amazon Q Business – You can use tabular search to extract answers from tables embedded in documents ingested in Q Business. You can drag and drop files to upload and reuse any recently uploaded files in new conversations without uploading the files again. Amazon Q Business now supports integrations to Smartsheet in general, and Asana, Google Calendar in preview to automatically sync your index with your selected data sources. You can also use Q Business browser extensions for Google Chrome, Mozilla Firefox, and Microsoft Edge.

Amazon Q Developer – You can ask questions directly related to the AWS Management Console page you’re viewing, eliminating the need to specify the service or resource in your query. You can also use customizable chat responses generated by Q Developer in the IDE to securely connect Q Developer to your private codebases to receive more precise chat responses. Finally, you can use voice input and output capabilities in the AWS Console Mobile App along conversational prompts to list resources in your AWS account.

Amazon QuickSight – You can use Layer Map to visualize custom geographic boundaries, such as sales territories, or user-defined regions, and Image Component to upload your images directly for a variety of use cases, such as adding company logos. Amazon QuickSight also provides the ability to import visuals from an existing dashboard or analysis into your current analysis and Highcharts visuals to create custom visualizations using the Highcharts Core library in preview.

Amazon Redshift – You can ingest data from a wider range of streaming sources from Confluent Managed Cloud and self-managed Apache Kafka clusters on Amazon EC2 instances. You can also use enhanced security defaults which helps you adhere to best practices in data security and reduce the risk of potential misconfigurations.

AWS System Manager – You can use a new and improved version of AWS Systems Manager that brings a highly requested cross-account, and cross-Region experience for managing nodes at scale. AWS Systems Manager now supports instances running Windows Server 2025, Ubuntu Server 24.04, and Ubuntu Server 24.10.

Amazon S3 – You can configure S3 Lifecycle rules for S3 Express One Zone to expire objects on your behalf and append data to objects in S3 Express One Zone. You can also use Amazon S3 Express One Zone as a high performance read cache with Mountpoint for Amazon S3. Amazon S3 Connector for PyTorch now supports Distributed Checkpoint (DCP), improving the time to write checkpoints to Amazon S3.

Amazon VPC – You can use Block Public Access (BPA) for VPC, a new centralized declarative control that enables network and security administrators to authoritatively block Internet traffic for their VPCs. Amazon VPC Lattice now provides native integration with Amazon ECS, easily to deploy, manage, and scale containerized applications.

There’s a lot more launch news that I haven’t covered here. See AWS What’s New for more details.

See you virtually in AWS re:Invent
AWS re:Invent 2023Next week we’ll hear the latest news from AWS, learn from experts, and connect with the global cloud community in Las Vegas. If you come, check out the agenda, session catalog, and attendee guides before your departure.

If you’re not able to attend re:Invent in person, we’re offering the option to livestream our Keynotes and Innovation Talks. With the registration for online pass, you will have access to on-demand keynote, Innovation Talks, and selected breakout sessions after the event. You can also register with AWS Builder ID, a personal account that enables one-click event registration and provides access to many AWS tools and services.

Please stay tuned in the next week!

Channy


from AWS News Blog https://ift.tt/ZOWsPIB
via IFTTT

Friday, November 22, 2024

Introducing a new experience for AWS Systems Manager

Today, I’m excited to introduce a new and improved version of AWS Systems Manager that brings a highly requested cross-account, and cross-Region experience for managing nodes at scale.

The new System Manager experience provides centralized visibility of all your managed nodes which include various infrastructure types, such as Amazon Elastic Compute Cloud (EC2) instances, containers, virtual machines on other cloud providers, on-premise servers, and edge Internet of Things (IoT) devices. They are referred to as “managed nodes” when they have the Systems Manager Agent (SSM Agent) installed and are connected to Systems Manager.

If an SSM Agent stops working on a node for whatever reason, then Systems Manager loses connection to it and that node is then referred to as an “unmanaged node.” With the new update, Systems Manager can also help you to easily discover and troubleshoot unmanaged nodes. You can run and even schedule an automated diagnosis that provides you with recommended runbooks that you can execute to fix any issues and reestablish connection so they become managed nodes again.

Systems Manager is also now integrated with Amazon Q Developer, the most capable generative AI–powered assistant for software development. You can ask questions about your managed nodes to Amazon Q Developer using natural language and it will provide you with rapid insights plus links straight to Systems Manager where you can perform actions or continue to explore further.

With this release, you can also use AWS Organizations, to allow a delegated administrator to centrally manage nodes across the organization thanks to the new integration with Systems Manager.

the new systems manager experience

Let’s examine a quick example that helps to demonstrate some of these new capabilities.

Imagine a scenario where you are a cloud platform engineer leading a migration plan aiming to replace all nodes running Windows Server 2016 Datacenter in the organization. Let’s use the new Systems Manager experience to quickly gather information about all the nodes that needs to be included in our plan.

Step 1 – Asking Amazon Q Developer
The easiest starting point is using Amazon Q Developer to ask what you want to find using natural language. Using the AWS Console, I open the Amazon Q chatbot and type Find all of my managed nodes running Microsoft Windows Server 2016 Datacenter in my organization.

Amazon Q quickly comes back with an answer: it tells us that there are ten nodes that fit the criteria and provides a list with an overview of each one.

There is also a link that redirects to the new Explore nodes page in System Manager where we can learn more information. Let’s follow it.

Step 2 – Reviewing our infrastructure
The Explore nodes page provides a comprehensive overview of all managed nodes across your organization, with options to group and filter results for quick access. In this case, we can see that the results are already filtered by Operating system name providing us with a list of all the nodes that are running Microsoft Windows Server 2016 Datacenter.

This is a great start! We could just finish here by downloading the report and add those nodes to our migration plan, however, this page only shows you information about your managed nodes. Could it be that there are unmanaged nodes that need to included in our plan? Let’s find out.

Step 3 – Handling unmanaged nodes
Open the menu, and navigate to the Review node insights page. Here you can see a dashboard with widgets that provide insightful interactive charts that you can use to drill down and discover more information about your nodes or even take actions. For example, the Managed node types pie chart shows the types of managed nodes we have whereas the SSM Agent versions graph provides us with an overview of all the different versions of SSM Agent running on them. You can also customize this view by adding and replacing widgets.

We want to investigate any unmanaged nodes to make sure we don’t miss any that may need to be added to our migration plan. The Node summary widget clearly shows that there are two unmanaged nodes. This could mean that these nodes don’t have the SSM Agent installed in which case we will need to investigate them manually. However, it could also just mean there are issues with the SSM agent permissions or network connectivity preventing Systems Manager from managing these nodes and treating them like any other managed node. The new Systems Manager experience allows you easily troubleshoot and remediate SSM Agents issues so let’s attempt to do this now.

Start by selecting the piece of the chart displaying our unmanaged nodes. This pops up an option to initiate a comprehensive diagnosis of all our unmanaged nodes with only one click. Let’s run this.

The diagnosis reviews key configurations such as missing virtual private cloud (VPC) endpoints, misconfigured VPC DNS settings, and misconfigured instance security groups that may be preventing the SSM Agent from connecting to Systems Manager. After the scanning is complete, we can see that it displays two Misconfigured VPC endpoint findings. It also gives you a link that you can use to open a side panel containing a recommended runbook that you can execute to solve the issues as well as links to relevant documentation.

Choosing to execute the recommended runbook presents you with a detailed preview of the changes which include a thorough overview of the actions it’s going to take in addition to the input parameters used, a link to view a breakdown of the steps involved, and the target nodes for this execution.

Let’s choose to go ahead and select Execute. Keep in mind that this may incur costs, so make sure to review them before executing. You can keep an eye on progress on this page as it goes through the steps to attempt to fix the issues on each node.

Aha! After the remediation is complete, we can see that Systems Manager has found and corrected issues with the SSM Agent with two nodes. This means that Systems Manager is able to connect with the SSM Agent running in those nodes successfully making them “managed nodes.” We can verify this by returning to the Explore nodes page and noticing that the count of “unmanaged nodes” has been reduced to zero now.

Now that all of our nodes are managed, we’re ready to get a full list of all of those that need to be added to our migration plan.

Step 4 – Downloading a report
Back on the Explore nodes page we can see that the count for nodes running Microsoft Windows Server 2016 Datacenter has gone up from ten to twelve! That means that those previously unmanaged nodes that we fixed through the automated diagnosis are indeed running our target operating system.

This is exactly what we need so we choose to download a Report. You give it a file name, and then choose from a few options such as which columns to include. In this case, we choose to download a CSV file with a row containing the column names.

That’s it! We have our CSV with detailed information about the nodes that need upgrading across our entire infrastructure. And the best part? You can also use Systems Manager to automate the upgrade once you’re ready to go ahead with the migration.

Conclusion
Systems Manager is a critical tool for gaining visibility and control over your compute infrastructure and performing operational actions at scale. The new experience offers a centralized cross-account, cross-Region view of all your nodes in your AWS accounts, on-premises, and multicloud environments through a centralized dashboard, offering integration with Amazon Q Developer for natural language queries, and one-click SSM Agent troubleshooting. You can enable the new experience at no extra cost by navigating to the Systems Manager console and following the straightforward instructions.

To learn more, see the documentation for more detail about the new Systems Manager experience.

Check out this interactive demo for a full visual tour of this experience.


from AWS News Blog https://ift.tt/xbAuiBL
via IFTTT

AWS named as a leader again in the Gartner Magic Quadrant for Distributed Hybrid Infrastructure

Gartner published the second Magic Quadrant for Distributed Hybrid Infrastructure (DHI), which includes Amazon Web Services (AWS) as a leader again. AWS has three products in this DHI portfolio: AWS Outposts, AWS Snowball, and AWS Local Zones. In the accompanying Gartner’s Critical Capabilities for DHI, AWS is ranked number one in four out of six use cases evaluated by Gartner—including hybrid infrastructure management, edge computing, assured workloads, and artificial intelligence & machine learning (AI/ML)—and among the top two in the use case of container management.

Gartner evaluates 10 DHI providers based on their Ability to Execute, which measures a vendor’s capacity to deliver its products or services effectively, and Completeness of Vision, which assesses a vendor’s understanding of the market and its strategy for future growth.

Here is the graphical representation of the 2024 Gartner Magic Quadrant for DHI.

Gartner recognized AWS strengths as:

  • Leading public cloud provider – AWS DHI solutions appeal to AWS public cloud customers that want to extend their infrastructure to their data center and edge locations, while also migrating from their remaining private cloud infrastructure.
  • As-a-service delivery – The fully managed infrastructure delivery of AWS Outposts simplifies operations and enables a hands-off, single-vendor approach to infrastructure management, including integration with some on-premises technologies.
  • AWS support – Gartner clients report high satisfaction with the AWS worldwide support and services team.

We believe this leader placement reflects our innovation at the edge of the cloud for workloads that require low latency, local data processing, data residency, or migration with on-premises interdependencies. At AWS, we extend the same AWS infrastructure, AWS services, APIs, and tools wherever you need them for a truly consistent cloud experience.

Whether your workloads are running in the AWS Regions, in metro areas with AWS Local Zones, on premises with AWS Outposts, in the telco networks with AWS Wavelength, or at the far edge with AWS Snow Family, you can standardize on the same cloud operating model for all your applications. You can streamline developer workflow by standardizing on a common set of continuous integration and continuous deployment (CI/CD) pipelines. It also reduces the time, resources, operational risk, and maintenance downtime required to manage IT infrastructure.

As examples of accelerated innovation, we have added the latest generation of GPU-backed instances to Local Zones to better support ML workloads and expanded the number of locations. We have made Outposts available in more countries and added AWS services supported on Outposts to facilitate migration and disaster recovery, such as AWS Elastic Disaster Recovery and Amazon Route 53 Resolver to improve application availability and performance.

In addition, we have improved the disconnection tolerance for container-based workloads on Outposts by making it possible for customers to run both the Kubernetes control plane and nodes locally, and we enhanced its capabilities for multi-rack Outposts deployments.

Access the complete 2024 Gartner Magic Quadrant for DHI report to learn more.

Channy

Gartner does not endorse any vendor, product or service depicted in its research publications and does not advise technology users to select only those vendors with the highest ratings or other designation. Gartner research publications consist of the opinions of Gartner’s research organization and should not be construed as statements of fact. Gartner disclaims all warranties, expressed or implied, with respect to this research, including any warranties of merchantability or fitness for a particular purpose.

GARTNER is a registered trademark and service mark of Gartner and Magic Quadrant is a registered trademark of Gartner, Inc. and/or its affiliates in the U.S. and internationally and are used herein with permission. All rights reserved.


from AWS News Blog https://ift.tt/5ejnMTx
via IFTTT

Improve your app authentication workflow with new Amazon Cognito features

Introduced 10 years ago, Amazon Cognito is a service that helps you implement customer identity and access management (CIAM) in your web and mobile applications. You can use Amazon Cognito for various use cases, from providing your customers to quickly add sign-in and sign-up experiences to your applications and authorization to securing machine-to-machine authentication and enabling role-based access to AWS resources.

Today, I’m excited to share a series of significant updates to Amazon Cognito. These enhancements aim to provide you with more flexibility, improved security, and a better user experience for your applications.

Here’s a quick summary:

A new developer-focused console experience
Amazon Cognito now offers a streamlined getting-started experience featuring a quick wizard and use case-specific recommendations. This new approach helps you set up configurations and reach your end users faster and more efficiently than ever before.

This is the new Amazon Cognito flow to help you quickly set up your application. You can get started in three steps:

  1. Choose the type of application you need to build
  2. Configure the sign-in options according to the type of your application
  3. Follow the instructions to integrate the sign-in and sign-up pages with your application

Then, select Create.

Amazon Cognito then automatically creates your application and a new user pool, which is a user directory for authentication and authorization. From here, you can review your sign-in page by selecting View login page or get started with the example code for your application. Furthermore, Amazon Cognito supports major application frameworks and offers detailed instructions for integrating them using standard OpenID Connect (OIDC) and OAuth open source libraries.

This is the new overview dashboard for your application. The user pool dashboard now provides important information in the Details section, as well as a set of Recommendations to help you continue your development journey.

On this page, you can customize your users’ sign-in and sign-up experience with the Managed Login feature. This is a good segue for me to provide you with a quick overview of the next new feature.

Introducing Managed Login
The introduction of Managed Login brings a new level of customization to Amazon Cognito. Managed Login handles the heavy lifting of availability, scaling, and security for your company. Once integrated, you automatically get all the new security patches and future features without further code changes.

This feature allows you to create personalized sign-up and sign-in experiences that are a seamless part of your company’s application for your end users.

Before you can use Managed Login, you need to assign a domain. There are two ways to do this: use a prefix domain, a randomly generated sub-domain of Amazon Cognito domain, or use your own custom domain to provide your users with a familiar domain name.

Then, you can choose your Branding version, selecting either Managed login or classic Hosted UI.

If you’re an existing Amazon Cognito user, you might be familiar with the classic Hosted UI feature. Managed Login is the improved version of Hosted UI, offering a new collection of web interfaces for sign-up and sign-in, built-in responsiveness for different screen sizes, multi-factor authentication, and password-reset activities in your user pool.

With Managed Login, you can use the new branding designer, a no-code visual editor for managed login assets and style, and a set of API operations for programmatic configuration or deployment via infrastructure-as-code with AWS CloudFormation.

With the branding designer, you have the flexibility to customize the look and feel of the entire user journey, from sign up and sign in to password recovery and multi-factor authentication. This feature provides a real time preview and convenient shortcuts to preview screens in different screen sizes and display modes before you launch it.

You can learn more about Managed Login by visiting the Managed Login documentation page.

Passwordless login support
The Managed Login feature also offers pre-built integrations for passwordless authentication methods, including signing in with passkeys, email OTP (one-time-password) and SMS OTP. Passkey support allows users to authenticate using cryptographic keys stored securely on their devices, offering better security compared to traditional passwords. This capability helps you implement low-friction and secure authentication methods without the need to understand and implement WebAuthn related protocols.

By reducing the friction associated with traditional password-based sign-ins, this feature simplifies application access for your users while maintaining high security standards.

Visit the user pools authentication flow documentation page to learn more about the passwordless login support.

More options on pricing tiers: Lite, Essentials and Plus
Amazon Cognito has introduced new user pool feature tiers: Lite, Essentials, and Plus. These tiers are designed to cater to different customer needs and use cases with the Essentials tier being the default tier for new users pools created by customers. This new tier structure also allows you to choose the most appropriate option based on your application requirements, with the flexibility to switch between tiers as needed.

To check your current tier, you can go to your application dashboard and select Feature plan. You can also select Settings from the navigation menu.

On this page, you’ll get detailed information for each tier and the option to downgrade or upgrade your plan.

Here’s a quick overview of each tier:

  1. Lite tier: Existing features such as user registration, password-based authentication, and social identity provider integration are now packaged in this tier. If you’re an existing Amazon Cognito user, you can continue using these features without making changes to your user pools. 

  2. Essentials tier: Offers comprehensive authentication and access control features, allowing you to implement secure, scalable, and customized sign-up and sign-in experiences for your application within minutes. It includes all capabilities in Lite along with supporting Managed Login and passwordless login options using passkeys, email, or SMS. Essentials also supports customizing access tokens and disallowing password reuse.

  3. Plus tier: Builds upon the Essentials tier, focusing on elevated security needs. It includes all Essentials features plus threat protection capabilities against suspicious login activity, detection of compromised credentials, risk-based adaptive authentication, and the ability to export user authentication event logs for threat analysis.

Pricing for the Lite, Essentials and Plus tiers is based on monthly active users. Customers currently using the advanced security features of Amazon Cognito should consider the Plus tier, which includes all the advanced security features, additional capabilities such as passwordless, and up to 60 percent savings as compared to using the standalone advanced security features.

If you want to learn about these new pricing tiers, see the Amazon Cognito pricing page.

Things you need to know

  • Availability – The Essentials and Plus tier are available in all AWS Regions where Amazon Cognito is available except AWS GovCloud (US) Regions.
  • Free tier on Lite and Essentials tiers – Customers on the Lite and Essentials tiers can enjoy the free tier each month that does not automatically expire. It is available to both existing and new AWS customers indefinitely. For more details on free tier, please visit the Amazon Cognito pricing page.

  • Extended pricing benefit for existing customers – Customers are eligible to upgrade their user pools without advanced security features (ASF) in their existing accounts to Essentials and pay the same price as Cognito user pools until November 30, 2025. To be eligible, customers’ accounts must have had at least 1 monthly active user (MAU) in the last 12 months on or before 10:00am Pacific Time, November 22, 2024. These customers are also eligible to create new user pools with Essentials tier at the same price as Cognito users pools in those accounts until November 30, 2025.

With these updates, you can implement secure, scalable, and customizable authentication solutions for your applications with Amazon Cognito.

Happy building,
Donnie


from AWS News Blog https://ift.tt/5ZRg73u
via IFTTT

Thursday, November 21, 2024

Track performance of serverless applications built using AWS Lambda with Application Signals

In November 2023, we announced Amazon CloudWatch Application Signals, an AWS built-in application performance monitoring (APM) solution, to solve the complexity associated with monitoring performance of distributed systems for applications hosted on Amazon EKS, Amazon ECS, and Amazon EC2. Application Signals automatically correlates telemetry across metrics, traces, and logs, to speed up troubleshooting and reduce application disruption. By providing an integrated experience for analyzing performance in the context of your applications, Application Signals gives you improved productivity focusing on the applications that support your most critical business functions.

Today we’re announcing the availability of Application Signals for AWS Lambda to eliminate the complexities of manual setup and performance issues required to assess application health for Lambda functions. With CloudWatch Application Signals for Lambda, you can now collect application golden metrics (the incoming and outgoing volume of requests, latency, faults, and errors).

AWS Lambda abstracts away the complexity of the underlying infrastructure, enabling you to focus on building your application without having to monitor server health. This allows you to shift your focus toward monitoring the performance and health of your applications, which is necessary to operate your applications at peak performance and availability. This requires deep visibility into performance insights such as volume of transactions, latency spikes, availability drops, and errors for your critical business operations and application programming interfaces (APIs).

Previously, you had to spend significant time correlating disjointed logs, metrics, and traces across multiple tools to establish the root cause of anomalies, increasing mean time to recovery (MTTR) and operational costs. Additionally, building your own APM solutions with custom code or manual instrumentation using open source (OSS) libraries was time-consuming, complex, operationally expensive, and often resulted in increased cold start times and deployment challenges when managing large fleets of Lambda functions. Now, you can use Application Signals to seamlessly monitor and troubleshoot health and performance issues in serverless applications, without requiring any manual instrumentation or code changes from your application developers.

How it works
Using the pre-built, standardized dashboards of Application Signals, you can identify the root cause of performance anomalies in just a few clicks by drilling down into performance metrics for critical business operations and APIs. This helps you visualize application topology which shows interactions between the function and its dependencies. In addition, you can define Service Level Objectives (SLOs) on your applications to monitor specific operations that matter most to you. An example of an SLO could be to set a goal that a webpage should render within 2000 ms 99.9 percent of the time in a rolling 28-day interval.

Application Signals auto-instruments your Lambda function using enhanced AWS Distro for OpenTelemetry (ADOT) libraries. This delivers better performance such as lower cold start latency,
memory consumption, and function invocation duration, so you can quickly monitor your applications.

I have an existing Lambda function appsignals1 and I will configure Application Signals in the Lambda Console to collect various telemetry on this application.

In the Configuration tab of the function I select Monitoring and operations tools to enable both the Application signals and the Lambda service traces.

I have an application myAppSignalsApp that has this Lambda function attached as a resource. I’ve defined an SLO for my application to monitor specific operations that matter most to me. I’ve defined a goal that states that the application executes within 10 ms 99.9 percent of the time in a rolling 1-day interval.

It can take 5-10 minutes for Application Signals to discover the function after it’s been invoked. As a result you’ll need to refresh the Services page before you can see the service.

Now I’m in the Services page and I can see a list of all my Lambda functions that have been discovered by Application Signals. Any telemetry that is emitted will be displayed here.

I can then visualize the complete application topology from the Service Map and quickly spot anomalies across my service’s individual operations and dependencies, using the newly collected metrics of volume of requests, latency, faults, and errors. To troubleshoot, I can click into any point in time for any application metric graph to discover correlated traces and logs related to that metric, to quickly identify if issues impacting end users are isolated to an individual task or deployment.

Available now
Amazon CloudWatch Application Signals for Lambda is now generally available and you can start using it today in all AWS Regions where Lambda and Application Signals are available. Today, Application Signals is available for Lambda functions that use Python and Node.js managed runtimes. We’ll continue to add support for other Lambda runtimes in near future.

To learn more, visit the AWS Lambda developer guide and Application Signals developer guide. You can submit your questions to AWS re:Post for Amazon CloudWatch, or through your usual AWS Support contacts.

Veliswa.


from AWS News Blog https://ift.tt/lhGT81W
via IFTTT