Wednesday, July 16, 2025

Introducing Amazon Bedrock AgentCore: Securely deploy and operate AI agents at any scale (preview)

In just a few years, foundation models (FMs) have evolved from being used directly to create content in response to a user’s prompt, to now powering AI agents, a new class of software applications that use FMs to reason, plan, act, learn, and adapt in pursuit of user-defined goals with limited human oversight. This new wave of agentic AI is enabled by the emergence of standardized protocols such as Model Context Protocol (MCP) and Agent2Agent (A2A) that simplify how agents connect with other tools and systems.

In fact, building AI agents that can reliably perform complex tasks has become increasingly accessible thanks to open source frameworks like CrewAI, LangGraph, and Strands Agents. However, moving from a promising proof-of-concept to a production-ready agent that can scale to thousands of users presents significant challenges.

Instead of being able to focus on the core features of the agent, developers and AI engineers have to spend months building foundational infrastructure for session management, identity controls, memory systems, and observability—at the same time supporting security and compliance.

Today, we’re excited to announce the preview of Amazon Bedrock AgentCore, a comprehensive set of enterprise-grade services that help developers quickly and securely deploy and operate AI agents at scale using any framework and model, hosted on Amazon Bedrock or elsewhere.

More specifically, we are introducing today:

AgentCore Runtime – Provides sandboxed low-latency serverless environments with session isolation, supporting any agent framework including popular open source frameworks, tools, and models, and handling multimodal workloads and long-running agents.

AgentCore Memory – Manages session and long-term memory, providing relevant context to models while helping agents learn from past interactions.

AgentCore Observability – Offers step-by-step visualization of agent execution with metadata tagging, custom scoring, trajectory inspection, and troubleshooting/debugging filters.

AgentCore Identity – Enables AI agents to securely access AWS services and third-party tools and services such as GitHub, Salesforce, and Slack, either on behalf of users or by themselves with pre-authorized user consent.

AgentCore Gateway – Transforms existing APIs and AWS Lambda functions into agent-ready tools, offering unified access across protocols, including MCP, and runtime discovery.

AgentCore Browser – Provides managed web browser instances to scale your agents’ web automation workflows.

AgentCore Code Interpreter – Offers an isolated environment to run the code your agents generate.

These services can be used individually and are optimized to work together so developers don’t need to spend time piecing together components. AgentCore can work with open source or custom AI agent frameworks, giving teams the flexibility to maintain their preferred tools while gaining enterprise capabilities. To integrate these services into their existing code, developers can use the AgentCore SDK.

You can now discover, buy, and run pre-built agents and agent tools from AWS Marketplace with AgentCore Runtime. With just a few lines of code, your agents can securely connect to API-based agents and tools from AWS Marketplace with AgentCore Gateway to help you run complex workflows while maintaining compliance and control.

AgentCore eliminates tedious infrastructure work and operational complexity so development teams can bring groundbreaking agentic solutions to market faster.

Let’s see how this works in practice. I’ll share more info on the services as we use them.

Deploying a production-ready customer support assistant with Amazon Bedrock AgentCore (Preview)
When customers reach out with an email, it takes time to provide a reply. Customer support needs to check the validity of the email, find who the actual customer is in the customer relationship management (CRM) system, check their orders, and use product-specific knowledge bases to find the information required to prepare an answer.

An AI agent can simplify that by connecting to the internal systems, retrieve contextual information using a semantic data source, and draft a reply for the support team. For this use case, I built a simple prototype using Strands Agents. For simplicity and to validate the scenario, the internal tools are simulated using Python functions.

When I talk to developers, they tell me that similar prototypes, covering different use cases, are being built in many companies. When these prototypes are demonstrated to the company leadership and receive confirmation to proceed, the development team has to define how to go in production and satisfy the usual requirements for security, performance, availability, and scalability. This is where AgentCore can help.

Step 1 – Deploying to the cloud with AgentCore Runtime

AgentCore Runtime is a new service to securely deploy, run, and scale AI agents, providing isolation so that each user session runs in its own protected environment to help prevent data leakage—a critical requirement for applications handling sensitive data.

To match different security postures, agents can use different network configurations:

Sandbox – To only communicate with allowlisted AWS services.

Public – To run with managed internet access.

VPC-only (coming soon) – This option will allow to access resources hosted in a customer’s VPC or connected via AWS PrivateLink endpoints.

To deploy the agent to the cloud and get a secure, serverless endpoint with AgentCore Runtime, I add to the prototype a few lines of code using the AgentCore SDK to:

  • Import the AgentCore SDK.
  • Create the AgentCore app.
  • Specify which function is the entry point to invoke the agent.

Using a different or custom agent framework is a matter of replacing the agent invocation inside the entry point function.

Here’s the code of the prototype. The three lines I added to use AgentCore Runtime are the ones preceded by a comment.

from strands import Agent, tool
from strands_tools import calculator, current_time

# Import the AgentCore SDK
from bedrock_agentcore.runtime import BedrockAgentCoreApp

WELCOME_MESSAGE = """
Welcome to the Customer Support Assistant! How can I help you today?
"""

SYSTEM_PROMPT = """
You are an helpful customer support assistant.
When provided with a customer email, gather all necessary info and prepare the response email.
When asked about an order, look for it and tell the full description and date of the order to the customer.
Don't mention the customer ID in your reply.
"""

@tool
def get_customer_id(email_address: str):
    if email_address == "me@example.net":
        return { "customer_id": 123 }
    else:
        return { "message": "customer not found" }

@tool
def get_orders(customer_id: int):
    if customer_id == 123:
        return [{
            "order_id": 1234,
            "items": [ "smartphone", "smartphone USB-C charger", "smartphone black cover"],
            "date": "20250607"
        }]
    else:
        return { "message": "no order found" }

@tool
def get_knowledge_base_info(topic: str):
    kb_info = []
    if "smartphone" in topic:
        if "cover" in topic:
            kb_info.append("To put on the cover, insert the bottom first, then push from the back up to the top.")
            kb_info.append("To remove the cover, push the top and bottom of the cover at the same time.")
        if "charger" in topic:
            kb_info.append("Input: 100-240V AC, 50/60Hz")
            kb_info.append("Includes US/UK/EU plug adapters")
    if len(kb_info) > 0:
        return kb_info
    else:
        return { "message": "no info found" }

# Create an AgentCore app
app = BedrockAgentCoreApp()

agent = Agent(
    system_prompt=SYSTEM_PROMPT,
    tools=[calculator, current_time, get_customer_id, get_orders, get_knowledge_base_info]
)

# Specify the entrypoint function invoking the agent
@app.entrypoint
def invoke(payload, context: RequestContext):
    """Handler for agent invocation"""
    user_message = payload.get(
        "prompt", "No prompt found in input, please guide customer to create a json payload with prompt key"
    )
    result = agent(user_message)
    return {"result": result.message}

if __name__ == "__main__":
    app.run()

I install the AgentCore SDK and the starter toolkit in the Python virtual environment:

pip install bedrock-agentcore bedrock-agentcore-starter-toolkit

After I activate the virtual environment, I have access to the AgentCore command line interface (CLI) provided by the starter toolkit.

First, I use agentcore configure --entrypoint my_agent.py -er <IAM_ROLE_ARN> to configure the agent, passing the AWS Identity and Access Management (IAM) role that the agent will assume. In this case, the agent needs access to Amazon Bedrock to invoke the model. The role can give access to other AWS resources used by an agent, such as an Amazon Simple Storage Service (Amazon S3) bucket or a Amazon DynamoDB table.

I launch the agent locally with agentcore launch --local. When running locally, I can interact with the agent using agentcore invoke --local <PAYLOAD>. The payload is passed to the entry point function. Note that the JSON syntax of the invocations is defined in the entry point function. In this case, I look for prompt in the JSON payload, but can use a different syntax depending on your use case.

When I am satisfied by local testing, I use agentcore launch to deploy to the cloud.

After the deployment is succesful and an endpoint has been created, I check the status of the endpoint with agentcore status and invoke the endpoint with agentcore invoke <PAYLOAD>. For example, I pass a customer support request in the invocation:

agentcore invoke '{"prompt": "From: me@example.net – Hi, I bought a smartphone from your store. I am traveling to Europe next week, will I be able to use the charger? Also, I struggle to remove the cover. Thanks, Danilo"}'

Step 2 – Enabling memory for context

After an agent has been deployed in the AgentCore Runtime, the context needs to be persisted to be available for a new invocation. I add AgentCore Memory to maintain session context using its short-term memory capabilities.

First, I create a memory client and the memory store for the conversations:

from bedrock_agentcore.memory import MemoryClient

memory_client = MemoryClient(region_name="us-east-1")

memory = memory_client.create_memory_and_wait(
    name="CustomerSupport", 
    description="Customer support conversations"
)

I can now use create_event to stores agent interactions into short-term memory:

memory_client.create_event(
    memory_id=memory.get("id"), # Identifies the memory store
    actor_id="user-123",        # Identifies the user
    session_id="session-456",   # Identifies the session
    messages=[
        ("Hi, ...", "USER"),
        ("I'm sorry to hear that...", "ASSISTANT"),
        ("get_orders(customer_id='123')", "TOOL"),
        . . .
    ]
)

I can load the most recent turns of a conversations from short-term memory using list_events:

conversations = memory_client.list_events(
    memory_id=memory.get("id"), # Identifies the memory store
    actor_id="user-123",        # Identifies the user 
    session_id="session-456",   # Identifies the session
    max_results=5               # Number of most recent turns to retrieve
)

With this capability, the agent can maintain context during long sessions. But when a users come back with a new session, the conversation starts blank. Using long-term memory, the agent can personalize user experiences by retaining insights across multiple interactions.

To extract memories from a conversation, I can use built-in AgentCore Memory policies for user preferences, summarization, and semantic memory (to capture facts) or create custom policies for specialized needs. Data is stored encrypted using a namespace-based storage for data segmentation.

I change the previous code creating the memory store to include long-term capabilities by passing a semantic memory strategy. Note that an existing memory store can be updated to add strategies. In that case, the new strategies are applied to newer events.

memory = memory_client.create_memory_and_wait(
    name="CustomerSupport", 
    description="Customer support conversations",
    strategies=[{
        "semanticMemoryStrategy": {
            "name": "semanticFacts",
            "namespaces": ["/facts/{actorId}"]
        }
    }]
)

After long-term memory has been configured for a memory store, calling create_event will automatically apply those strategies to extract information from the conversations. I can then retrieve memories extracted from the conversation using a semantic query:

memories = memory_client.retrieve_memories(
    memory_id=memory.get("id"),
    namespace="/facts/user-123",
    query="smartphone model"
)

In this way, I can quickly improve the user experience so that the agent remembers customer preferences and facts that are outside of the scope of the CRM and use this information to improve the replies.

Step 3 – Adding identity and access controls

Without proper identity controls, access from the agent to internal tools always uses the same access level. To follow security requirements, I integrate AgentCore Identity so that the agent can use access controls scoped to the user’s or agent’s identity context.

I set up an identity client and create a workload identity, a unique identifier that represents the agent within the AgentCore Identity system:

from bedrock_agentcore.services.identity import IdentityClient

identity_client = IdentityClient("us-east-1")
workload_identity = identity_client.create_workload_identity(name="my-agent")

Then, I configure the credential providers, for example:

google_provider = identity_client.create_oauth2_credential_provider(
    {
        "name": "google-workspace",
        "credentialProviderVendor": "GoogleOauth2",
        "oauth2ProviderConfigInput": {
            "googleOauth2ProviderConfig": {
                "clientId": "your-google-client-id",
                "clientSecret": "your-google-client-secret",
            }
        },
    }
)

perplexity_provider = identity_client.create_api_key_credential_provider(
    {
        "name": "perplexity-ai",
        "apiKey": "perplexity-api-key"
    }
)

I can then add the @requires_access_token Python decorator (passing the provider name, the scope, and so on) to the functions that need an access token to perform their activities.

Using this approach, the agent can verify the identity through the company’s existing identity infrastructure, operate as a distinct, authenticated identity, act with scoped permissions and integrate across multiple identity providers (such as Amazon Cognito, Okta, or Microsoft Entra ID) and service boundaries including AWS and third-party tools and services (such as Slack, GitHub, and Salesforce).

To offer robust and secure access controls while streamlining end-user and agent builder experiences, AgentCore Identity implements a secure token vault that stores users’ tokens and allows agents to retrieve them securely.

For OAuth 2.0 compatible tools and services, when a user first grants consent for an agent to act on their behalf, AgentCore Identity collects and stores the user’s tokens issued by the tool in its vault, along with securely storing the agent’s OAuth client credentials. Agents, operating with their own distinct identity and when invoked by the user, can then access these tokens as needed, reducing the need for frequent user consent.

When the user token expires, AgentCore Identity triggers a new authorization prompt to the user for the agent to obtain updated user tokens. For tools that use API keys, AgentCore Identity also stores these keys securely and gives agents controlled access to retrieve them when needed. This secure storage streamlines the user experience while maintaining robust access controls, enabling agents to operate effectively across various tools and services.

Step 4 – Expanding agent capabilities with AgentCore Gateway

Until now, all internal tools are simulated in the code. Many agent frameworks, including Strands Agents, natively support MCP to connect to remote tools. To have access to internal systems (such as CRM and order management) via an MCP interface, I use AgentCore Gateway.

With AgentCore Gateway, the agent can access AWS services using Smithy models, Lambda functions, and internal APIs and third-party providers using OpenAPI specifications. It employs a dual authentication model to have secure access control for both incoming requests and outbound connections to target resources. Lambda functions can be used to integrate external systems, particularly applications that lack standard APIs or require multiple steps to retrieve information.

AgentCore Gateway facilitates cross-cutting features that most customers would otherwise need to build themselves, including authentication, authorization, throttling, custom request/response transformation (to match underlying API formats), multitenancy, and tool selection.

The tool selection feature helps find the most relevant tools for a specific agent’s task. AgentCore Gateway brings a uniform MCP interface across all these tools, using AgentCore Identity to provide an OAuth interface for tools that do not support OAuth out of the box like AWS services.

Step 5 – Adding capabilities with AgentCore Code Interpreter and Browser tools

To answer to customer requests, the customer support agent needs to perform calculations. To simplify that, I use the AgentCode SDK to add access to the AgentCore Code Interpreter.

Similarly, some of the integrations required by the agent don’t implement a programmatic API but need to be accessed through a web interface. I give access to the AgentCore Browser to let the agent navigate those web sites autonomously.

Step 6 – Gaining visibility with observability

Now that the agent is in production, I need visibility into its activities and performance. AgentCore provides enhanced observability to help developers effectively debug, audit, and monitor their agent performance in production. It comes with built-in dashboards to track essential operational metrics such as session count, latency, duration, token usage, error rates, and component-level latency and error breakdowns. AgentCore also gives visibility into an agent’s behavior by capturing and visualizing both the end-to-end traces, as well as “spans” that capture each step of the agent workflow including tool invocations, memory

The built-in dashboards offered by this service help reveal performance bottlenecks and identify why certain interactions might fail, enabling continuous improvement and reducing the mean time to detect (MTTD) and mean time to repair (MTTR) in case of issues.

AgentCore supports OpenTelemetry to help integrate agent telemetry data with existing observability platforms, including Amazon CloudWatch, Datadog, LangSmith, and Langfuse.

Step 7 – Conclusion

Through this journey, we transformed a local prototype into a production-ready system. Using AgentCore modular approach, we implemented enterprise requirements incrementally—from basic deployment to sophisticated memory, identity management, and tool integration—all while maintaining the existing agent code.

Things to know
Amazon Bedrock AgentCore is available in preview in US East (N. Virginia), US West (Oregon), Asia Pacific (Sydney), and Europe (Frankfurt). You can start using AgentCore services through the AWS Management Console , the AWS Command Line Interface (AWS CLI), the AWS SDKs, or via the AgentCore SDK.

You can try AgentCore services at no charge until September 16, 2025. Standard AWS pricing applies to any additional AWS Services used as part of using AgentCore (for example, CloudWatch pricing will apply for AgentCore Observability). Starting September 17, 2025, AWS will bill you for AgentCore service usage based on this page.

Whether you’re building customer support agents, workflow automation, or innovative AI-powered experiences, AgentCore provides the foundation you need to move from prototype to production with confidence.

To learn more and start deploying production-ready agents, visit the AgentCore documentation. For code examples and integration guides, check out the AgentCore samples GitHub repo.

Join the AgentCore Preview Discord server to provide feedback and discuss use cases. We’d like to hear from you!

— Danilo


from AWS News Blog https://ift.tt/wjH1CaB
via IFTTT
Tuesday, July 15, 2025

TwelveLabs video understanding models are now available in Amazon Bedrock

Earlier this year, we preannounced that TwelveLabs video understanding models were coming to Amazon Bedrock. Today, we’re announcing the models are now available for searching through videos, classifying scenes, summarizing, and extracting insights with precision and reliability.

TwelveLabs has introduced Marengo, a video embedding model proficient at performing tasks such as search and classification, and Pegasus, a video language model that can generate text based on video data. These models are trained on Amazon SageMaker HyperPod to deliver groundbreaking video analysis that provides text summaries, metadata generation, and creative optimization.

With the TwelveLabs models in Amazon Bedrock, you can find specific moments using natural language video search capabilities like “show me the first touchdown of the game” or “find the scene where the main characters first meet” and instantly jump to those exact moments. You can also build applications to understand video content by generating descriptive text such as titles, topics, hashtags, summaries, chapters, or highlights for discovering insights and connections without requiring predefined labels or categories.

For example, you can find recurring themes in customer feedback or spot product usage patterns that weren’t obvious before. Whether you have hundreds or thousands of hours of video content, you can now transform that entire library into a searchable knowledge resource while maintaining enterprise-grade security and performance.

Let’s take a look at the Marengo and Pegasus videos that TwelveLabs has published.

You can transform video workflows with these models across industries. Media producers and editors can instantly locate specific scenes or dialogue, which means you can focus on storytelling rather than sifting through hours of footage. Marketing teams are streamlining their advertising workflows by quickly personalizing content to resonate with various audiences, while security teams are using the technology to proactively identify potential risks by spotting patterns across multiple video feeds.

Getting started with TwelveLabs models in Amazon Bedrock
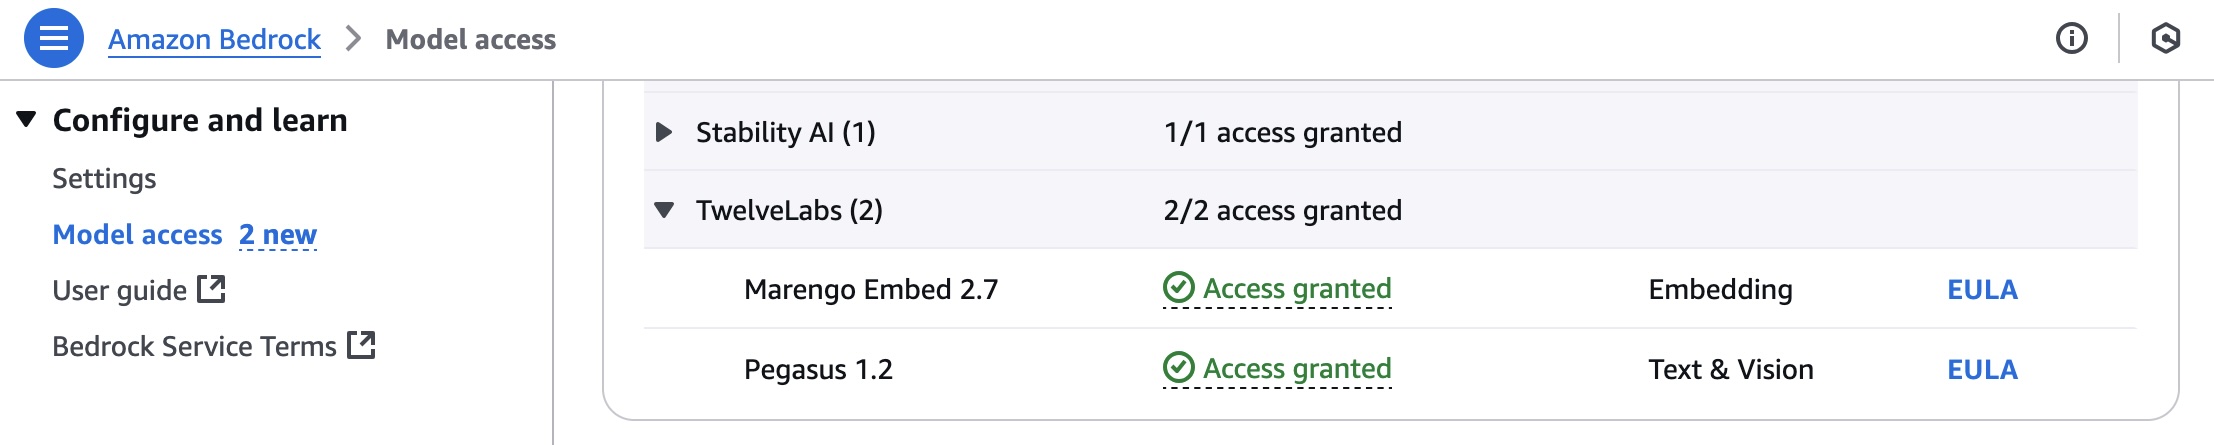
Before getting started, if you’re new to using TwelveLabs models, go to the Amazon Bedrock console and choose Model access in the bottom left navigation pane. To access the latest TwelveLabs models, request access for Marengo Embed 2.7 and Pegasus 1.2 in TwelveLabs.

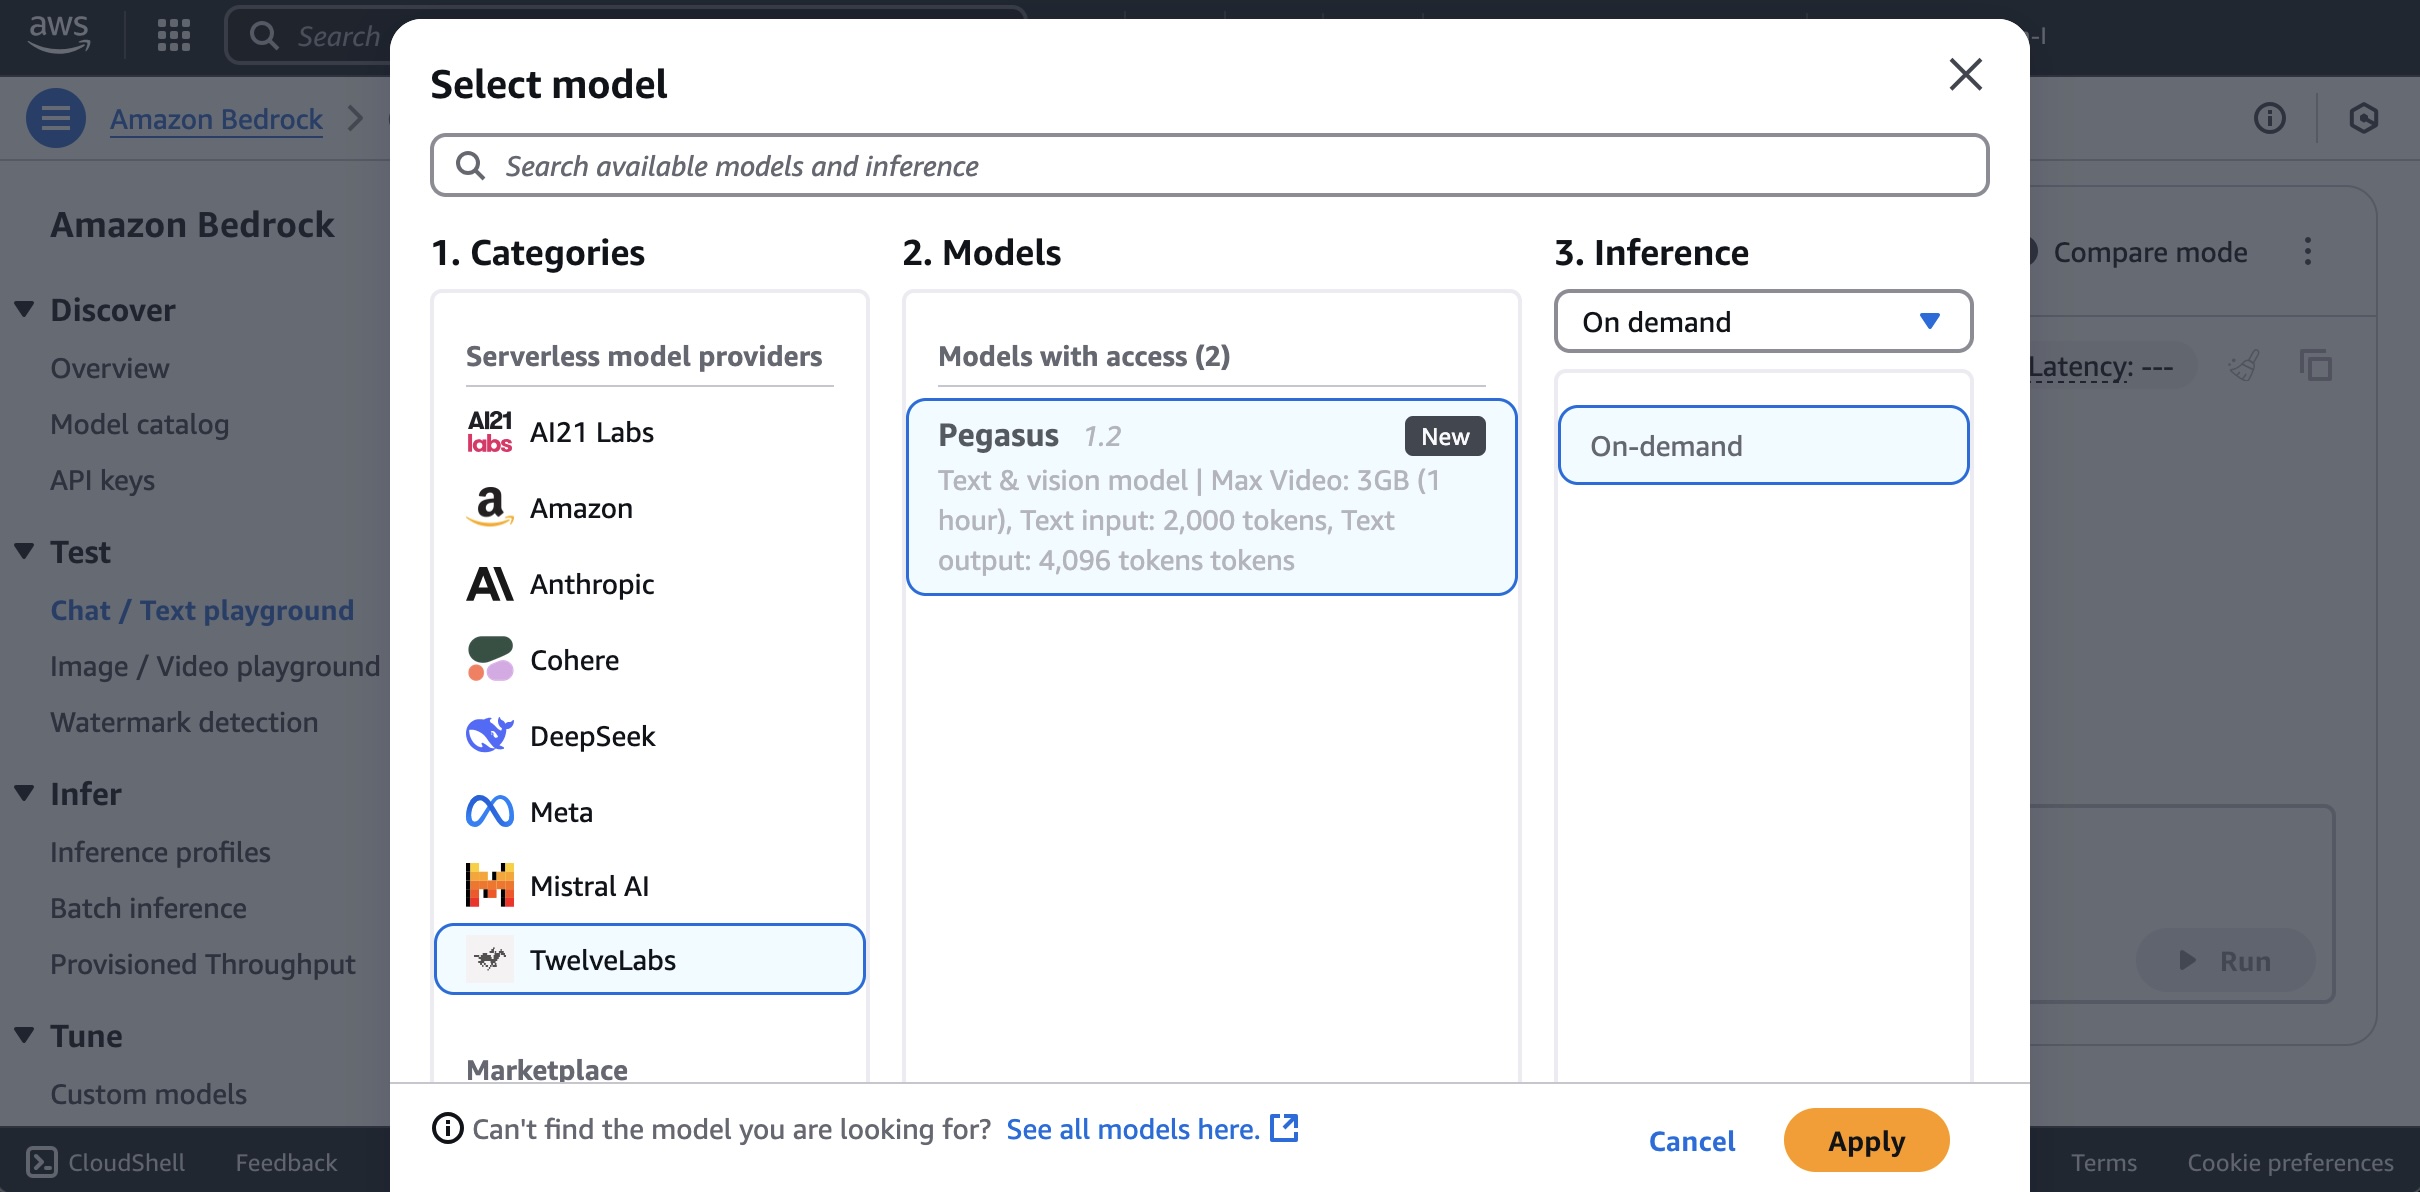
To use TwelveLabs models in Amazon Bedrock, choose Chat/Text Playground under Test in the left navigation pane. Choose Select model, select TwelveLabs as the category and Pegasus as the model, and then choose Apply.

For searching or generating text from your video, you should upload your video to an Amazon Simple Storage Service (Amazon S3) bucket or input Base64-formatted video string.

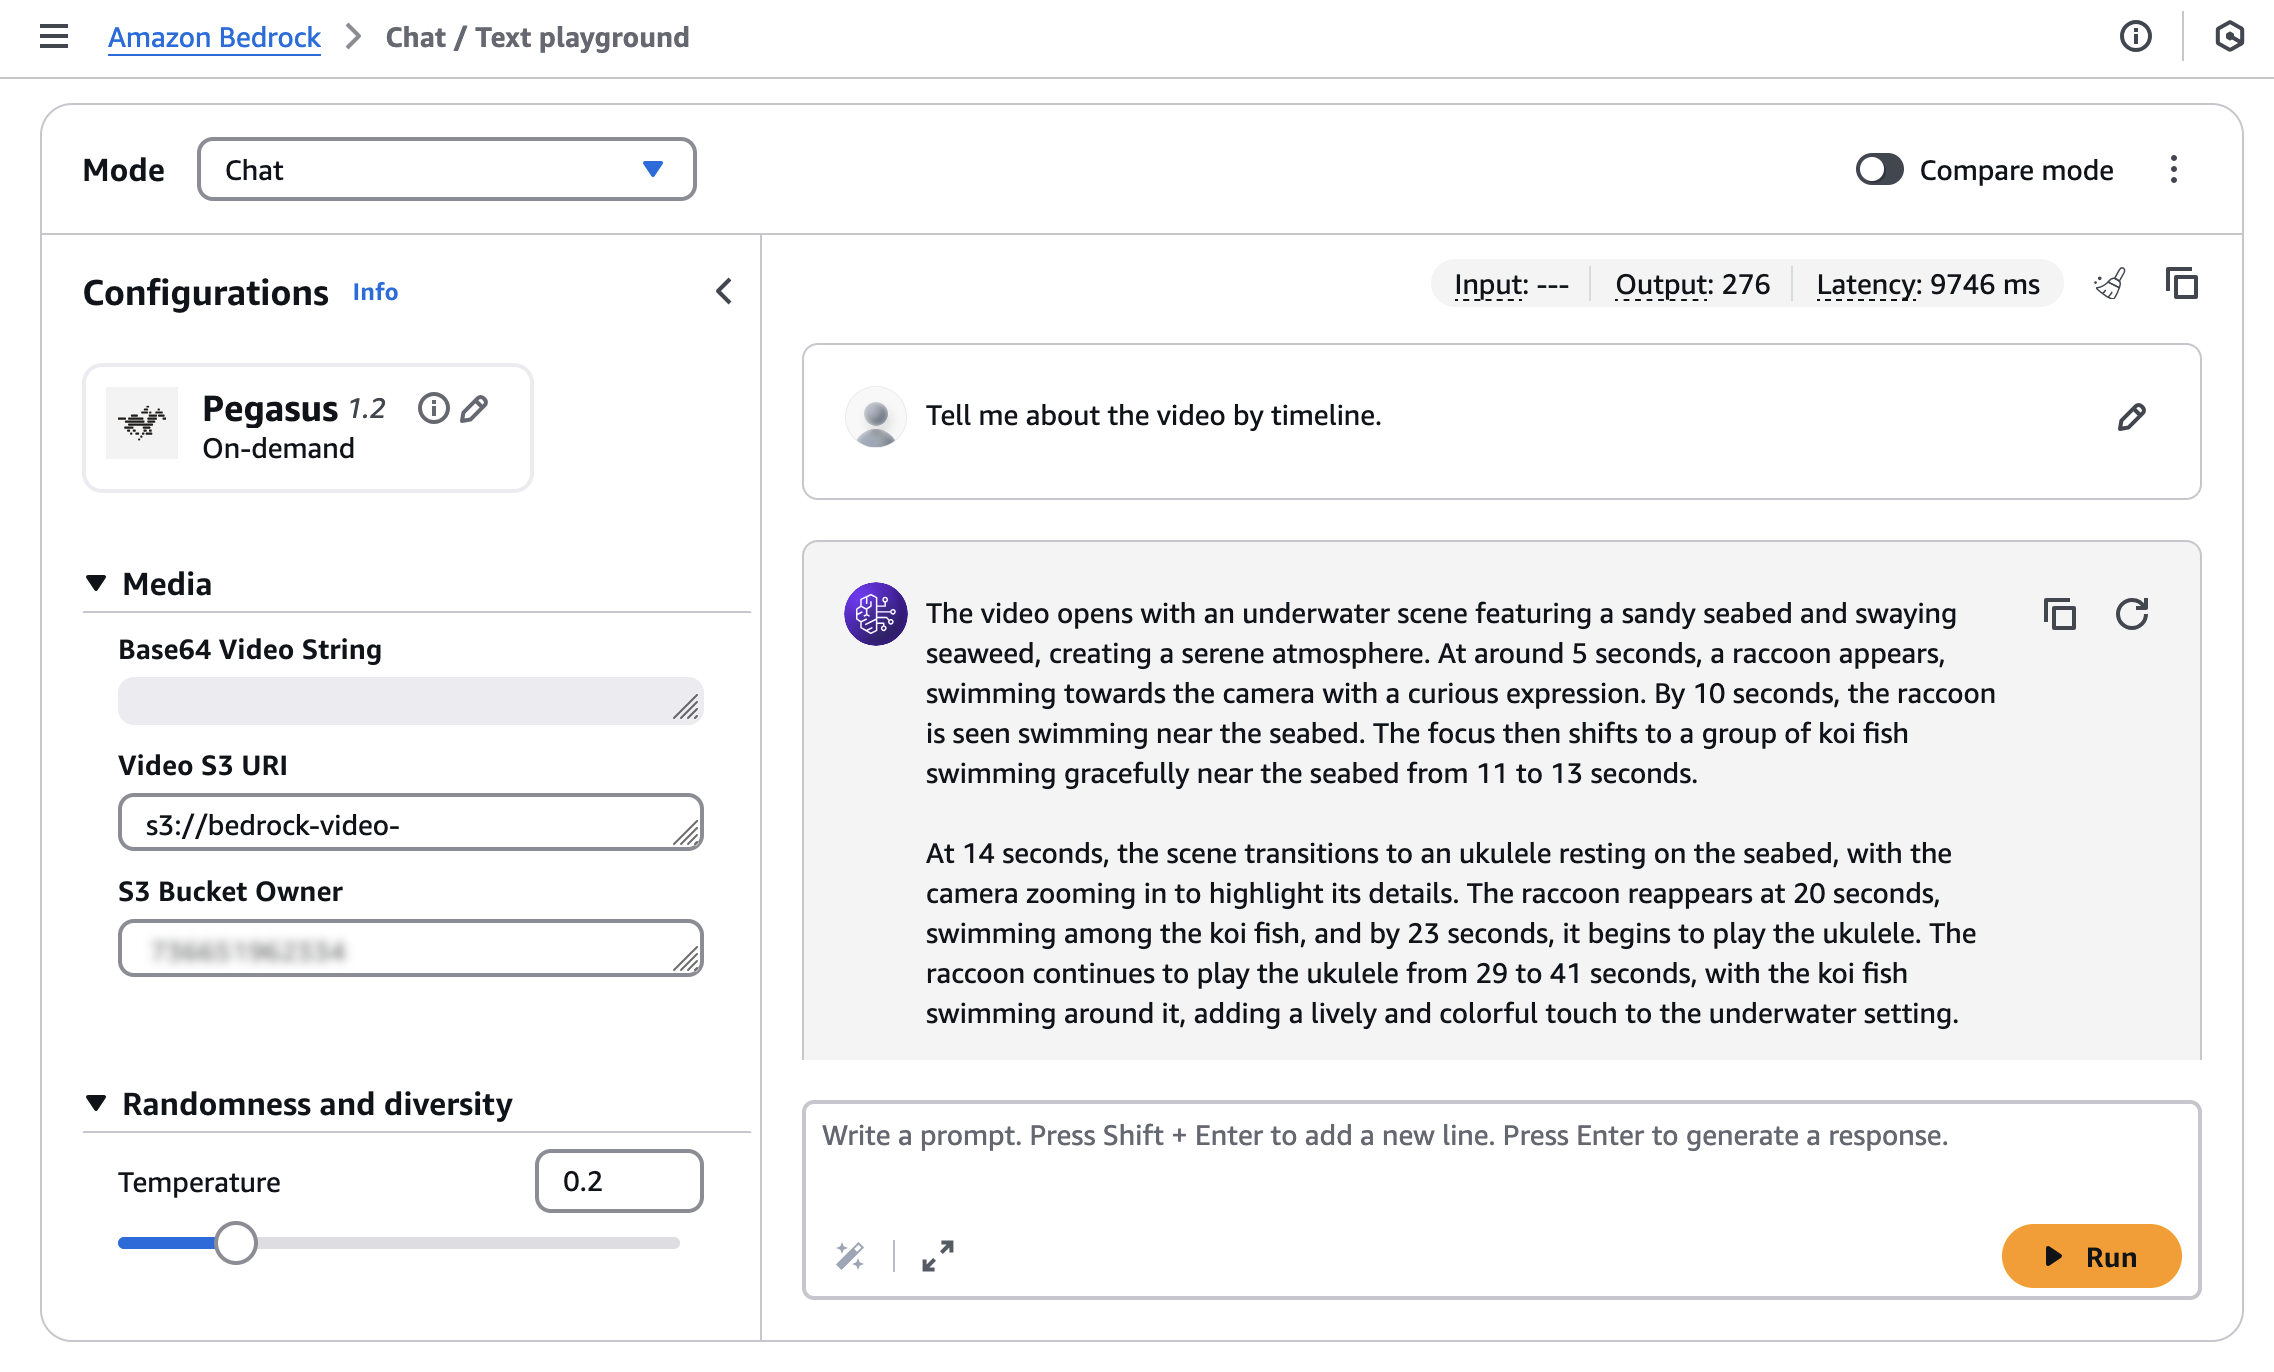
I will use a sample video generated with Amazon Nova Reel with a prompt: “A cute raccoon playing guitar underwater.”

Enter the S3 URI of your uploaded video and the S3 Bucket Owner, and then run your prompt: “Tell me about the video by timeline”.

You can get following model response:

The video opens with an underwater scene featuring a sandy seabed and swaying seaweed, creating a serene atmosphere. At around 5 seconds, a raccoon appears, swimming towards the camera with a curious expression. By 10 seconds, the raccoon is seen swimming near the seabed. The focus then shifts to a group of koi fish swimming gracefully near the seabed from 11 to 13 seconds.

At 14 seconds, the scene transitions to an ukulele resting on the seabed, with the camera zooming in to highlight its details. The raccoon reappears at 20 seconds, swimming among the koi fish, and by 23 seconds, it begins to play the ukulele. The raccoon continues to play the ukulele from 29 to 41 seconds, with the koi fish swimming around it, adding a lively and colorful touch to the underwater setting.

From 42 to 49 seconds, the raccoon is shown playing the ukulele with the koi fish swimming around it. The video concludes with a screen displaying "Video generated with Amazon Novo Reel 1.1" and "Available in Amazon Bedrock" from 50 to 54 seconds, followed by the AWS logo from 55 to 57 seconds.

The TwelveLabs models can be easily integrated into your applications using the Amazon Bedrock Converse API, which provides a unified interface for conversational AI interactions.

Here’s an example of how to use the AWS SDK for Python (Boto3) with the TwelveLabs Pegasus model:

import boto3
import json
import os

AWS_REGION = "us-east-1"
MODEL_ID = "twelvelabs.pegasus-1-2-v1:0"
VIDEO_PATH = "sample.mp4"

def read_file(file_path: str) -> bytes:
    """Read a file in binary mode."""
    try:
        with open(file_path, 'rb') as file:
            return file.read()
    except Exception as e:
        raise Exception(f"Error reading file {file_path}: {str(e)}")

bedrock_runtime = boto3.client(
    service_name="bedrock-runtime",
    region_name=AWS_REGION
)

request_body = {
    "messages": [
        {
            "role": "user",
            "content": [
                {
                    "inputPrompt": "tell me about the video",
                    "mediaSource: {
                        "base64String": read_file(VIDEO_PATH)
                    }
                },
            ],
        }
    ]
}

response = bedrock_runtime.converse(
    modelId=MODEL_ID,
    messages=request_body["messages"]
)

print(response["output"]["message"]["content"][-1]["text"])

The TwelveLabs Marengo Embed 2.7 model generates vector embeddings from video, text, audio, or image inputs. These embeddings can be used for similarity search, clustering, and other machine learning (ML) tasks. The model supports asynchronous inference through the Bedrock AsyncInvokeModel API.

For video source, you can request JSON format for the TwelveLabs Marengo Embed 2.7 model using the AsyncInvokeModel API.

{
    "modelId": "twelvelabs.marengo-embed-2.7",
    "modelInput": {
        "inputType": "video",
        "mediaSource": {
            "s3Location": {
                "uri": "s3://your-video-object-s3-path",
                "bucketOwner": "your-video-object-s3-bucket-owner-account"
            }
        }
    },
    "outputDataConfig": {
        "s3OutputDataConfig": {
            "s3Uri": "s3://your-bucket-name"
        }
    }
}

You can get a response delivered to the specified S3 location.

{
    "embedding": [0.345, -0.678, 0.901, ...],
    "embeddingOption": "visual-text",
    "startSec": 0.0,
    "endSec": 5.0
}

To help you get started, check out a broad range of code examples for multiple use cases and a variety of programming languages. To learn more, visit TwelveLabs Pegasus 1.2 and TwelveLabs Marengo Embed 2.7 in the AWS Documentation.

Now available
TwelveLabs models are generally available today in Amazon Bedrock: the Marengo model in the US East (N. Virginia), Europe (Ireland), and Asia Pacific (Seoul) Region, and the Pegasus model in US West (Oregon), and Europe (Ireland) Region accessible with cross-Region inference from US and Europe Regions. Check the full Region list for future updates. To learn more, visit the TwelveLabs in Amazon Bedrock product page and the Amazon Bedrock pricing page.

Give TwelveLabs models a try on the Amazon Bedrock console today, and send feedback to AWS re:Post for Amazon Bedrock or through your usual AWS Support contacts.

— Channy


from AWS News Blog https://ift.tt/AwBQFva
via IFTTT

Monday, July 14, 2025

AWS Weekly Roundup: AWS Builder Center, Amazon Q, Oracle Database@AWS, and more (July 14, 2025)

Summer is well and truly here in the UK! I’m a bit of a summer grinch though so, unlike most people, I’m not crazy about “the glorious sun” scorching me when I’m out and about. On the upside, this provides the perfect excuse to retreat to the comfort of a well-ventilated room where I can focus on coding and curating the latest AWS releases to bring you the highlights.

I also managed to escape the heat for most of yesterday while recording an episode for the AWS Developers Podcast where the wonderful Sebastien Stormaq and Tiffany Souterre interviewed me about games development. If you haven’t discovered it yet, I highly recommend you give it a go as the episodes are full of interesting lessons and insights from not just AWS, but customers and community members who share their stories and expertise in a relaxed conversation.

Alright, ready to discover some of the new things we released last week? Here are the highlights.

AWS Builder Center
There is a new home for AWS builders and community members! AWS Builder Center is a new place where cloud builders can connect, share knowledge, and access resources to enhance their AWS journey. The platform enables users to join community programs, discover trending topics, access AWS Skill Builder courses, participate in technical challenges, and more, using a single Builder ID sign-in.

One the features that I’m personally most excited about is the Wishlist. You can now create wishes and tell AWS directly about ways to improve our products and services or share original ideas that you think could help you and your teams. You can also browse and upvote existing wishes to support any suggestions that you think should be prioritized. The AWS teams will keep an eye on this and if a wish has enough traction it may just be considered!

Read the news blog post for a quick tour through some of the most exciting features or head over to AWS Builder Center and start exploring!

AI
The world of AI keeps moving fast and changing our world, by providing new and exciting ways to do things and become more productive. Here are two releases from last week that caught my attention.

  • Amazon Q chat in the AWS Management Console can now query AWS service data – Amazon Q Developer expands its capabilities by enabling natural language queries of data stored across AWS services like S3, DynamoDB, and CloudWatch, directly from the AWS Console, Slack, Microsoft Teams, and AWS Console Mobile Application. This enhancement streamlines cloud management and troubleshooting by allowing users to access and analyze service data through conversational interfaces, with access controls managed through IAM permissions.
  • Amazon CloudWatch and Application Signals MCP servers for AI-assisted troubleshooting – AWS has released two new Model Context Protocol (MCP) servers – CloudWatch MCP and Application Signals MCP – that enable AI agents to leverage observability data for automated troubleshooting through conversational interfaces. These open-source servers allow AI assistants to analyze metrics, alarms, logs, traces, and service health data across AWS environments, streamlining incident response and root cause analysis without requiring developers to manually navigate multiple AWS consoles.

Oracle Database@AWS
It seems like yesterday when Andy Jassy announced our partnership with Oracle to create Oracle Database@AWS, a jointly offered service that runs Oracle databases on Exadata infrastructure directly within AWS data centers, providing a unified AWS-Oracle experience. Fast forward to last week and Oracle Database@AWS has reached a significant milestone with its general availability release. It is now available in US East (N. Virginia) and US West (Oregon) regions, with plans to expand to 20 additional regions globally.

In addition, VPC Lattice has added support for Oracle Database@AWS enabling seamless connectivity between applications in VPCs and on-premises environments to Oracle database networks. The integration simplifies network management and provides secure access from Oracle Database@AWS to AWS services like Amazon S3 and Amazon Redshift, without requiring complex networking setup.

So if you’re looking to migrate your Oracle database workloads, now is a great time to explore Oracle Database@AWS as it offers a compelling path forward with minimal modifications required.

Additional highlights
Here are some other releases that I think many people will be happy about.

  • AWS Config now supports 12 new resource types – AWS Config has expanded its monitoring capabilities with support for 12 new resource types across services including BackupGateway, CloudFront, EntityResolution, Bedrock, and more. These additions are automatically tracked if you have enabled recording for all resource types, enhancing your ability to discover, assess, and audit AWS resources.
  • Amazon SageMaker Studio now supports remote connections from Visual Studio Code – Amazon SageMaker Studio now supports remote connections from Visual Studio Code, allowing developers to use their familiar VS Code setup while leveraging SageMaker’s scalable compute resources for AI development.
  • AWS Network Firewall: Native AWS Transit Gateway support in all regions – AWS Network Firewall now offers native integration with AWS Transit Gateway across all supported regions, enabling direct attachment and simplified traffic inspection between VPCs and on-premises networks. This integration eliminates the need for managing dedicated VPC subnets and route tables while providing multi-AZ redundancy for improved security and reliability.

Upcoming AWS Events
AWS Summit New York – this is definitely one to watch…literally! Registrations are closed due to capacity but you can tune in to watch live all the announcements and launches! No spoilers, but, trust me, there are a quite a few exciting things in store, so make sure to check it out.

AWS Gen AI Lofts – AWS Gen AI Lofts are multi-day events offering hands-on workshops, expert guidance, and networking opportunities for developers and business leaders looking to explore or advance their generative AI journey. These events are hosted across multiple global locations including San Francisco, Berlin, Dubai, Dublin, Bengaluru, Manchester, Paris, and Tel Aviv, providing accessible opportunities to accelerate your generative AI adoption.

And that’s it for this week! Come back next Monday for more highlights and keep your AWS knowledge up to date as we cover the latest releases.

Matheus Guimaraes | @codingmatheus

from AWS News Blog https://ift.tt/D9jTh2p
via IFTTT

Wednesday, July 9, 2025

New Amazon EC2 P6e-GB200 UltraServers accelerated by NVIDIA Grace Blackwell GPUs for the highest AI performance

Today, we’re announcing the general availability of Amazon Elastic Compute Cloud (Amazon EC2) P6e-GB200 UltraServers, accelerated by NVIDIA GB200 NVL72 to offer the highest GPU performance for AI training and inference. Amazon EC2 UltraServers connect multiple EC2 instances using a dedicated, high-bandwidth, and low-latency accelerator interconnect across these instances.

The NVIDIA Grace Blackwell Superchips connect two high-performance NVIDIA Blackwell tensor core GPUs and an NVIDIA Grace CPU based on Arm architecture using the NVIDIA NVLink-C2C interconnect. Each Grace Blackwell Superchip delivers 10 petaflops of FP8 compute (without sparsity) and up to 372 GB HBM3e memory. With the superchip architecture, GPU and CPU are colocated within one compute module, increasing bandwidth between GPU and CPU significantly compared to current generation EC2 P5en instances.

With EC2 P6e-GB200 UltraServers, you can access up to 72 NVIDIA Blackwell GPUs within one NVLink domain to use 360 petaflops of FP8 compute (without sparsity) and 13.4 TB of total high bandwidth memory (HBM3e). Powered by the AWS Nitro System, P6e-GB200 UltraServers are deployed in EC2 UltraClusters to securely and reliably scale to tens of thousands of GPUs.

EC2 P6e-GB200 UltraServers deliver up to 28.8 Tbps of total Elastic Fabric Adapter (EFAv4) networking. EFA is also coupled with NVIDIA GPUDirect RDMA to enable low-latency GPU-to-GPU communication between servers with operating system bypass.

EC2 P6e-GB200 UltraServers specifications
EC2 P6e-GB200 UltraServers are available in sizes ranging from 36 to 72 GPUs under NVLink. Here are the specs for EC2 P6e-GB200 UltraServers:

UltraServer type GPUs
GPU
memory (GB)
vCPUs Instance memory
(GiB)
Instance storage (TB) Aggregate EFA Network Bandwidth (Gbps) EBS bandwidth (Gbps)
u-p6e-gb200x36 36 6660 1296 8640 202.5 14400 540
u-p6e-gb200x72 72 13320 2592 17280 405 28800 1080

P6e-GB200 UltraServers are ideal for the most compute and memory intensive AI workloads, such as training and inference of frontier models, including mixture of experts models and reasoning models, at the trillion-parameter scale.

You can build agentic and generative AI applications, including question answering, code generation, video and image generation, speech recognition, and more.

P6e-GB200 UltraServers in action
You can use EC2 P6e-GB200 UltraServers in the Dallas Local Zone through EC2 Capacity Blocks for ML. The Dallas Local Zone (us-east-1-dfw-2a) is an extension of the US East (N. Virginia) Region.

To reserve your EC2 Capacity Blocks, choose Capacity Reservations on the Amazon EC2 console. You can select Purchase Capacity Blocks for ML and then choose your total capacity and specify how long you need the EC2 Capacity Block for u-p6e-gb200x36 or u-p6e-gb200x72 UltraServers.

Once Capacity Block is successfully scheduled, it is charged up front and its price doesn’t change after purchase. The payment will be billed to your account within 12 hours after you purchase the EC2 Capacity Blocks. To learn more, visit Capacity Blocks for ML in the Amazon EC2 User Guide.

To run instances within your purchased Capacity Block, you can use AWS Management Console, AWS Command Line Interface (AWS CLI) or AWS SDKs. On the software side, you can start with the AWS Deep Learning AMIs. These images are preconfigured with the frameworks and tools that you probably already know and use: PyTorch, JAX, and a lot more.

You can also integrate EC2 P6e-GB200 UltraServers seamlessly with various AWS managed services. For example:

  • Amazon SageMaker Hyperpod provides managed, resilient infrastructure that automatically handles the provisioning and management of P6e-GB200 UltraServers, replacing faulty instances with preconfigured spare capacity within the same NVLink domain to maintain performance.
  • Amazon Elastic Kubernetes Services (Amazon EKS) allows one managed node group to span across multiple P6e-GB200 UltraServers as nodes, automating their provisioning and lifecycle management within Kubernetes clusters. You can use EKS topology-aware routing for P6e-GB200 UltraServers, enabling optimal placement of tightly coupled components of distributed workloads within a single UltraServer’s NVLink-connected instances.
  • Amazon FSx for Lustre file systems provide data access for P6e-GB200 UltraServers at the hundreds of GB/s of throughput and millions of input/output operations per second (IOPS) required for large-scale HPC and AI workloads. For fast access to large datasets, you can use up to 405 TB of local NVMe SSD storage or virtually unlimited cost-effective storage with Amazon Simple Storage Service (Amazon S3).

Now available
Amazon EC2 P6e-GB200 UltraServers are available today in the Dallas Local Zone (us-east-1-dfw-2a) through EC2 Capacity Blocks for ML. For more information, visit the Amazon EC2 pricing page.

Give Amazon EC2 P6e-GB200 UltraServers a try in the Amazon EC2 console. To learn more, visit the Amazon EC2 P6e instances page and send feedback to AWS re:Post for EC2 or through your usual AWS Support contacts.

— Channy


from AWS News Blog https://ift.tt/bdsPC6p
via IFTTT

Introducing AWS Builder Center: A new home for the AWS builder community

We really love builders at AWS. We’re constantly thinking of new ways to help technical communities thrive and create spaces like AWS Developer Center and community.aws where people can connect and share their knowledge and experiences.

Today, we’re announcing AWS Builder Center, a new home for builders to access all builder resources, engage with the AWS community, and provide feedback or product suggestions to AWS product teams. This new experience also integrates the previous AWS Developer Center and community.aws.

There are a variety of exciting features so let us discover some of them.

Your voice matters: Introducing Wishlist
One of the most exciting new features, in my opinion, is Wishlist. You can now submit your wishes for new features or improvements you’d like to see in AWS services. Others can discover and vote on these wishes while also creating their own.

You can influence product roadmap collectively as a community and help us shape the future of AWS services. You can share ideas, suggestions, feature proposals, or challenges while operating AWS services, with the ability for the AWS community to upvote ideas and highlight the most sought-after improvements. Our internal teams will keep an eye on these and bring the most popular wishes to the attention of our service teams, making your voice an integral part of our product development process.

Connect people in the AWS community
On the Connect page, you’ll find many opportunities to connect directly with AWS Heroes and AWS Community Builders. You can explore and join AWS User Groups and AWS Cloud Clubs near your cities around the world.

On top of that, you can bookmark this page as your centralized hub for finding upcoming community events, making it easy to find opportunities to learn and network in your local area and meet like-minded builders who share your interests.

Speaking of following people, AWS Builder Center makes it really straightforward to connect and engage with others, serving as the central hub for the AWS technical community. It brings together all the different ways that you can connect with fellow builders. For example, the Who to Follow section introduces you to AWS Heroes, Community Builders, and active community members who are sharing their knowledge and expertise in your areas of interest.

Explore our AWS hands-on resources
On the Build page, you’ll discover ways to get familiar with AWS with hands-on experience such as interactive learning resources designed for every skill level such as AWS Tutorials and AWS Workshops. You can explore generative AI and agentic AI services playground and find the AWS Free Tier to try out AWS services free of charge up to specified limits for each service.

Choose the Toolbox page and discover the latest tools, programming language resources, and Open Source projects for AWS. The Toolbox has everything you need to get your project scaffolded and up and running.

To improve the build experience for builders, we plan to expand Builder Center’s built-in offerings such as creating dedicated groups and forums for collaborating on a particular topic, run workshops for hands-on labs, and various service playgrounds where builders can freely experiment with AWS services.

Supporting your builder journey
The new Learn section serves as your gateway to skill development, bringing together everything you need to expand your AWS expertise. Here, you can explore learning and training resources, workshops, gamified experiences, and more to make your journey of building on AWS both educational and engaging.

Choose the Topics page, where you can explore and discover more content. You can explore content by topics and tags. There is a featured and trending topics section that helps you to stay connected with what’s capturing the community’s attention right now.

Built-in localization for your spoken language
AWS Builder Center breaks down language barriers with comprehensive localization support. All content published in the Builder Center is automatically available in 16 languages, and user-generated content, such as posts, comments, or wishes, can be machine-translated on demand using Translate. So, you can collaborate with builders worldwide, sharing knowledge and experiences across language boundaries.

By default, all content will be displayed in based on the language that your browser is set to. But, you can override this by visiting the settings page and choosing the language that you want AWS Builder Center to use by default.

Sign up and build your profile now
AWS Builder Center gives you a more personalized and comprehensive way to showcase your AWS journey. Your unique profile comes with a custom URL and shareable QR code, making it straightforward to connect with others and share your presence in the AWS community.

All your posts, wishes, and meaningful interactions are organized within a centralized view so you can easily check them. In the Manage profile page, you can customize your profile, add specific interests and areas of expertise, helping you connect with builders who share your passions. Profile management is seamless: it synchronizes across all AWS services using AWS Builder ID, ensuring your identity remains consistent wherever you engage with AWS offerings.

Visit builder.aws.com, sign up with AWS Builder ID, and claim your unique alias to access all features, including content creation, Wishlist, and community engagement tools.

AWS Builder Center was designed to help you connect, learn, and build with fellow AWS builders, so enjoy your journey together!

— Channy & Matheus Guimaraes | @codingmatheus


from AWS News Blog https://ift.tt/jpe8ykx
via IFTTT

Tuesday, July 8, 2025

Introducing Oracle Database@AWS for simplified Oracle Exadata migrations to the AWS Cloud

Today, we’re announcing the general availability of Oracle Database@AWS, a new offering for Oracle Exadata workloads, including Oracle Real Application Clusters (RAC) within AWS.

In the past 14 years, customers had the choice of self-managing Oracle database workloads in the cloud using Amazon Elastic Compute Cloud (Amazon EC2) or using fully managed Amazon Relational Database Service (Amazon RDS) for Oracle. Now, you have an additional option for your workloads that require Oracle RAC or Oracle Exadata for quicker and simpler migrations to the cloud. You also get a single invoice through AWS Marketplace, which counts towards AWS commitments and Oracle license benefits, including Bring Your Own License (BYOL) and discount programs such as Oracle Support Rewards.

With Oracle Database@AWS, you can migrate your Oracle Exadata workloads to Oracle Exadata Database Service on Dedicated Infrastructure or Oracle Autonomous Database on Dedicated Exadata Infrastructure within AWS with minimal changes. You can purchase, provision, and manage your Oracle Database@AWS deployments through familiar AWS tools and interfaces such as AWS Management Console, AWS Command Line Interface (AWS CLI), or AWS APIs for applications running on AWS. The AWS APIs call the corresponding Oracle Cloud Infrastructure (OCI) APIs necessary to provision and manage the resources.

Since its preview last December, we’ve improved or added features to help run production workloads at general availability:

  • Regional expansion – You can now use Oracle Database@AWS in the U.S. East (N. Virginia) and U.S. West (Oregon) Regions today. We are also announcing plans to expand to 20 AWS Regions globally. This broader availability supports the diverse needs of our customers across various geographical areas so more enterprises can benefit from this option. You can choose from different Exadata system sizes to match your workload requirements in your AWS Region.
  • Zero-ETL and S3 backups – You can now benefit from zero-ETL integration with Amazon Redshift for analytics to remove the need to build and manage data pipelines for extract, transform, and load operations. With zero-ETL, you can unify your data on AWS without incurring cross network data transfer costs. We’re providing Amazon Simple Storage Service (Amazon S3) backups with up to eleven nines of data durability.
  • Autonomous VM cluster – You can now provision an Autonomous VM Cluster in addition to an Exadata VM cluster on the Exadata Dedicated Infrastructure. You can run Oracle Autonomous Database on Dedicated Exadata Infrastructure, a fully managed database environment using committed hardware and software resources.

Oracle Database@AWS also integrates with other AWS services such as Amazon Virtual Private Cloud (Amazon VPC) Lattice for configuring network paths to AWS services such as S3 and Redshift directly, AWS Identity and Access Management (IAM) for authentication and authorization, Amazon EventBridge for monitoring database lifecycle events, AWS CloudFormation for infrastructure automation, Amazon CloudWatch for collecting and monitoring metrics, and AWS CloudTrail for logging API operations.

Getting started with Oracle Database@AWS
Oracle Database@AWS supports two key services: Oracle Exadata Database Service on Dedicated Infrastructure and Oracle Autonomous Database on Dedicated Exadata Infrastructure within AWS data centers.

These services physically reside within an Availability Zone in an AWS Region and logically reside in an OCI region, enabling seamless integration with AWS services through high-speed, low-latency connections.

You create an ODB network, a private, isolated network that hosts Oracle Exadata VM Clusters within an Availability Zone. Then, you use ODB peering accessible to EC2 application servers running in a VPC. To learn more, visit How Oracle Database@AWS works in the AWS documentation.

Request a private offer in AWS Marketplace

To begin your journey with Oracle Database@AWS, visit the AWS console or request the AWS Marketplace private offer. Your AWS and Oracle sales team will receive your request, then contact you to find the best option for your workloads, and activate your account.

When you activate and get access to Oracle Database@AWS, you can use the Dashboard to create an ODB network, Exadata infrastructure, and Exadata VM cluster or Autonomous VM cluster, and ODB peering connection.

To learn more, visit the Onboarding to Oracle Database@AWS and AWS Marketplace buyer private offers in the AWS documentation.

Create an ODB network

An ODB network is a private isolated network that hosts OCI infrastructure on AWS. The ODB network maps directly to the network that exists within the OCI child site, thus serving as the means of communication between AWS and OCI.

In the Dashboard, choose Create ODB network, enter a network name, choose the Availability Zone, and specify a CIDR ranges for client connections established by applications and backup connections used for taking automated backups. You can also enter a name to use as a prefix to your domain fixed as oraclevcn.com. For example, if you enter myhost, the fully qualified domain name is myhost.oraclevcn.com.

Optionally, you can configure ODB network access to perform automated backups to Amazon S3 and zero-ETL for near real-time analytics and ML on your Oracle data using Amazon Redshift.

After you create your ODB network, update your VPC route tables of your EC2 application servers with the client connection CIDR in the ODB network. To learn more, visit ODB network, ODB peering, and Configuring VPC route tables for ODB peering in the AWS documentation.

Create Exadata infrastructure

The Oracle Exadata infrastructure is the underlying architecture of your database servers, storage servers, and networking that run your Oracle Exadata databases.

Choose Create Exadata infrastructure, enter a name, and use the default Availability Zone. In the next step, you can choose Exadata.X11M for the Exadata system model. You can also set a default of 2 or up to 32 database servers and 3 or up to 64 storage servers with 80 TB storage capacity per server.

Finally, you can configure system maintenance preferences, such as scheduling, patching mode, and OCI maintenance notification contacts. You can’t modify an infrastructure after you create it from the AWS console. But, you can navigate to the OCI console and modify it.

To delete an Exadata infrastructure, visit Deleting an Oracle Exadata infrastructure in Oracle Database@AWS in the AWS documentation.

Create an Exadata VM cluster or Autonomous VM cluster

You can create VM clusters on Exadata infrastructure and deploy multiple VM clusters with different Oracle Exadata infrastructures in the same ODB network.

Here are two types of VM clusters:

  • An Exadata VM cluster is a set of virtual machines that has a complete Oracle database installation that includes all features of Oracle Enterprise Edition.
  • An Autonomous VM cluster is a set of fully managed databases that automate key management tasks using AI/ML with no human intervention required.

Choose Create Exadata VM cluster, enter a VM cluster name and a time zone, choose Bring Your Own License (BYOL) or license included for license options. In the next step, you can choose your Exadata infrastructure, grid infrastructure version, and Exadata image version. For database servers, you can choose the CPU core count, memory, and local storage for each VM or accept the defaults.

In the next step, you can configure the connectivity setting by choosing your ODB network and entering a prefix for the VM cluster. You can enter a port number for TCP access to the single client access name (SCAN) listener. The default port is 1521 or you can enter a custom SCAN port in the range 1024–8999. For SSH key pairs, enter the public key portion of one or more key pairs used for SSH access to the VM cluster.

Then, you can choose diagnostics and tags, review your settings, and create a VM cluster. The creation process can take up to 6 hours, depending on the size of the VM cluster.

Create and manage an Oracle database

When the VM cluster is ready, you can create and manage your Oracle Exadata databases in the OCI console. Choose Manage in OCI in the details page of the Exadata VM cluster. You will be redirected to the OCI console.

When you create an Oracle Database in the OCI console, you can select Oracle Database 19c or 23ai. When enabling automatic backups for your provisioned databases, you can use an S3 bucket or OCI Object Storage in the OCI region. To learn more, visit Provision Oracle Exadata Database Service in Oracle Database@AWS in the OCI documentation.

Things to know
Here are a couple of things to know about Oracle Database@AWS:

  • Monitoring – You can monitor Oracle Database@AWS using Amazon CloudWatch metrics in the AWS/ODB namespaces for VM clusters, container databases, and pluggable databases. AWS CloudTrail captures all AWS API calls for Oracle Database@AWS as events. Using CloudTrail logs, you can determine the request that was made to Oracle Database@AWS, the IP address from which the request was made, when it was made, and additional details. To learn more, visit Monitoring Oracle Database@AWS.
  • Security – You can use IAM to assign permissions that determine who is allowed to manage Oracle Database@AWS resources and SSL/TLS encrypted connections to secure data. You can also use Amazon EventBridge for seamless event-driven database operations—all working together to maintain security standards while enabling efficient cloud operations. To learn more, visit Security in Oracle Database@AWS.
  • Compliance – Your compliance responsibility when using Oracle Database@AWS is determined by the sensitivity of your data, your company’s compliance objectives, and applicable laws and regulations. We provides the following compliances with Oracle Database@AWS: SOC 1, SOC 2, SOC 3, HIPAA, C5, CSA STAR Attest, CSA STAR Cert, HDS (France), ISO Series (ISO/IEC 9001, 20000-1, 27001, 27017, 27018, 27701, 22301), PCI DSS, and HITRUST. To learn more, visit Compliance validation for Oracle Database@AWS.
  • Support – Your AWS or Oracle sales account team can help you evaluate your current database infrastructure, determine how Oracle Database@AWS can best serve your organization’s requirements, and develop a tailored migration strategy and timeline. You can also get help from AWS Oracle Competency Partners specialized to architect, deploy, and manage Oracle-based workloads running in the AWS Cloud.

Now available and coming soon
Oracle Database@AWS is now available in the U.S. East (N. Virginia) and U.S. West (Oregon) Regions through the AWS Marketplace. Oracle Database@AWS pricing and any AWS Marketplace private offers are set by Oracle. You can see specific details around pricing on Oracle’s pricing page for the offering.

Oracle Database@AWS will expand to 20 more AWS Regions across the Americas, Europe, and Asia-Pacific including: US East (Ohio), US West (N. California), Asia Pacific (Hyderabad), Asia Pacific (Melbourne), Asia Pacific (Mumbai), Asia Pacific (Osaka), Asia Pacific (Seoul), Asia Pacific (Singapore), Asia Pacific (Sydney), Asia Pacific (Tokyo), Canada (Central), Europe (Frankfurt), Europe (Ireland), Europe (London), Europe (Milan), Europe (Paris), Europe (Spain), Europe (Stockholm), Europe (Zurich), and South America (São Paulo).

You can get started with Oracle Database@AWS with using AWS console. To learn more, visit the Oracle Database@AWS User Guide and OCI documentation and send feedback through your usual AWS Support contacts or OCI support.

— Channy


from AWS News Blog https://ift.tt/NlPhMa0
via IFTTT

Monday, July 7, 2025

AWS Weekly Roundup: EC2 C8gn instances, Amazon Nova Canvas virtual try-on, and more (July 7, 2025)

Every Monday we tell you about the best releases and blogs that caught our attention last week.

Before continuing with this AWS Weekly Roundup, I’d like to share that last month I moved with my family to San Francisco, California, to start a new role as Developer Advocate/SDE, GenAI.

This excites me because I’ll have the opportunity to connect with new communities in the Bay Area while tackling exciting new challenges. If you’re part of a community focused on building generative AI and agentics applications, or know of one, I’d love to connect. Let’s connect!

Last week’s launches
Here are the launches from last week:

  • New Amazon EC2 C8gn instances powered by AWS Graviton4 offering up to 600Gbps network bandwidth – Amazon Elastic Compute Cloud (Amazon EC2) C8gn instances are now generally available, powered by AWS Graviton4 processors and 6th generation AWS Nitro Cards. These network-optimized instances deliver up to 600 Gbps network bandwidth. This represents the highest bandwidth among EC2 network-optimized instances, with up to 192 vCPUs and 384 GiB memory. They provide 30% higher compute performance than C7gn instances and are ideal for network-intensive workloads like virtual appliances, data analytics, and cluster computing jobs.
  • Build the highest resilience apps with multi-Region strong consistency in Amazon DynamoDB global tables – Amazon DynamoDB global tables now supports multi-Region strong consistency (MRSC) for applications requiring zero Recovery Point Objective (RPO). This capability ensures applications can read the latest data from any Region during outages, addressing critical needs in payment processing and financial services. MRSC requires three AWS Regions configured as either three full replicas or two replicas plus a witness, providing the highest level of application resilience for mission-critical workloads.
  • Amazon Nova Canvas update: Virtual try-on and style options now available – Amazon Nova Canvas introduces virtual try-on capabilities that help you visualize how clothing looks on a person by combining two images, plus eight new pre-trained style options (3D animation, design sketch, vector illustration, graphic novel, etc.) for generating images with improved artistic consistency. Available in three AWS Regions, these features enhance AI-powered image generation capabilities for retailers and content creators seeking realistic product visualizations.
  • Amazon Q in Connect now supports 7 languages for proactive recommendations – Amazon Q in Connect, a generative AI-powered assistant for customer service, now provides proactive recommendations in seven languages: English, Spanish, French, Portuguese, Mandarin, Japanese, and Korean. The AI-powered customer service assistant detects customer intent during voice and chat interactions to help agents resolve issues quickly and accurately.
  • Amazon Aurora MySQL and Amazon RDS for MySQL integration with Amazon SageMaker is now available – This integration provides near real-time data availability for analytics. It automatically extracts MySQL data into lakehouses with Apache Iceberg compatibility. You can then access this data seamlessly through various analytics engines and machine learning tools.
  • Amazon Aurora DSQL is now available in additional AWS Regions – Amazon Aurora DSQL expands to Asia Pacific (Seoul) and now supports multi-Region clusters across Asia Pacific and European regions. This serverless, distributed SQL database offers unlimited scalability, highest availability, and zero infrastructure management with AWS Free Tier access.

Other AWS blog posts

  • Optimize RAG in production environments using Amazon SageMaker JumpStart and Amazon OpenSearch Service – Learn how to optimize Retrieval Augmented Generation (RAG) in production environments using Amazon SageMaker JumpStart and Amazon OpenSearch Service. This comprehensive guide demonstrates implementing RAG workflows with LangChain, covers OpenSearch optimization strategies, provides setup instructions, and explains benefits of combining these AWS services for scalable, cost-effective generative AI applications.v
  • Agentic GenAI App Using Bedrock, MCP servers on EKS – This post shows how to build a scalable AI chat application using Amazon Bedrock, Strands Agent, and Model Context Protocol (MCP) servers deployed on Amazon Elastic Kubernetes Service (Amazon EKS). The architecture combines agentic workflows with containerized microservices for intelligent, auto-scaling conversations with multiple foundation models.
  • Enforce table level access control on data lake tables using AWS Glue 5.0 with AWS Lake Formation – AWS Glue 5.0 introduces Full-Table Access (FTA) control for Apache Spark with AWS Lake Formation, providing table-level security without fine-grained access overhead. This feature supports native Spark SQL/DataFrames for Lake Formation tables. It enables read/write operations on Iceberg and Hive tables with improved performance and lower costs.

Upcoming AWS events
Check your calendars and sign up for these upcoming AWS events:

  • AWS re:Invent – Register now to get a head start on choosing your best learning path, booking travel and accommodations, and bringing your team to learn, connect, and have fun. Early-career professionals can apply for the All Builders Welcome Grant program, designed to remove financial barriers and create diverse pathways into cloud technology. Applications are now open and close on July 15, 2025.
  • AWS NY Summit – You can gain insights from Swami’s keynote featuring the latest cutting-edge AWS technologies in compute, storage, and generative AI. My News Blog team is also preparing some exciting news for you. If you’re unable to attend in person, you can still participate by registering for the global live stream. Also, save the date for these upcoming Summits in July and August near your city.
  • AWS Builders Online Series – If you’re based in one of the Asia Pacific time zones, join and learn fundamental AWS concepts, architectural best practices, and hands-on demonstrations to help you build, migrate, and deploy your workloads on AWS.
  • Join AWS Gen AI Lofts – Experience AWS Gen AI Lofts across San Francisco, Berlin, Dubai, Dublin, Bengaluru, Manchester, Paris, Tel Aviv, and additional locations – hands-on workshops, expert guidance, investor networking, and collaborative spaces designed to accelerate your generative AI startup journey.

You can browse all upcoming in-person and virtual events.

That’s all for this week. Check back next Monday for another Weekly Roundup!

— Eli


from AWS News Blog https://ift.tt/2RIrD43
via IFTTT

Wednesday, July 2, 2025

Amazon Nova Canvas update: Virtual try-on and style options now available

Have you ever wished you could quickly visualize how a new outfit might look on you before making a purchase? Or how a piece of furniture would look in your living room? Today, we’re excited to introduce a new virtual try-on capability in Amazon Nova Canvas that makes this possible. In addition, we are adding eight new style options for improved style consistency for text-to-image based style prompting. These features expand Nova Canvas AI-powered image generation capabilities making it easier than ever to create realistic product visualizations and stylized images that can enhance the experience of your customers.

Let’s take a quick look at how you can start using these today.

Getting started
The first thing is to make sure that you have access to the Nova Canvas model through the usual means. Head to the Amazon Bedrock console, choose Model access and enable Amazon Nova Canvas for your account making sure that you select the appropriate regions for your workloads. If you already have access and have been using Nova Canvas, you can start using the new features immediately as they’re automatically available to you.

Virtual try-on
The first exciting new feature is virtual try-on. With this, you can upload two pictures and ask Amazon Nova Canvas to put them together with realistic results. These could be pictures of apparel, accessories, home furnishings, and any other products including clothing. For example, you can provide the picture of a human as the source image and the picture of a garment as the reference image, and Amazon Nova Canvas will create a new image with that same person wearing the garment. Let’s try this out!

My starting point is to select two images. I picked one of myself in a pose that I think would work well for a clothes swap and a picture of an AWS-branded hoodie.

Matheus and AWS-branded hoodie

Note that Nova Canvas accepts images containing a maximum of 4.1M pixels – the equivalent of 2,048 x 2,048 – so be sure to scale your images to fit these constraints if necessary. Also, if you’d like to run the Python code featured in this article, ensure you have Python 3.9 or later installed as well as the Python packages boto3 and pillow.

To apply the hoodie to my photo, I use the Amazon Bedrock Runtime invoke API. You can find full details on the request and response structures for this API in the Amazon Nova User Guide. The code is straightforward, requiring only a few inference parameters. I use the new taskType of "VIRTUAL_TRY_ON". I then specify the desired settings, including both the source image and reference image, using the virtualTryOnParams object to set a few required parameters. Note that both images must be converted to Base64 strings.

import base64


def load_image_as_base64(image_path): 
   """Helper function for preparing image data."""
   with open(image_path, "rb") as image_file:
      return base64.b64encode(image_file.read()).decode("utf-8")


inference_params = {
   "taskType": "VIRTUAL_TRY_ON",
   "virtualTryOnParams": {
      "sourceImage": load_image_as_base64("person.png"),
      "referenceImage": load_image_as_base64("aws-hoodie.jpg"),
      "maskType": "GARMENT",
      "garmentBasedMask": {"garmentClass": "UPPER_BODY"}
   }
}

Nova Canvas uses masking to manipulate images. This is a technique that allows AI image generation to focus on specific areas or regions of an image while preserving others, similar to using painter’s tape to protect areas you don’t want to paint.

You can use three different masking modes, which you can choose by setting maskType to the correct value. In this case, I’m using "GARMENT", which requires me to specify which part of the body I want to be masked. I’m using "UPPER_BODY" , but you can use others such as "LOWER_BODY", "FULL_BODY", or "FOOTWEAR" if you want to specifically target the feet. Refer to the documentation for a full list of options.

I then call the invoke API, passing in these inference arguments and saving the generated image to disk.

# Note: The inference_params variable from above is referenced below.

import base64
import io
import json

import boto3
from PIL import Image

# Create the Bedrock Runtime client.
bedrock = boto3.client(service_name="bedrock-runtime", region_name="us-east-1")

# Prepare the invocation payload.
body_json = json.dumps(inference_params, indent=2)

# Invoke Nova Canvas.
response = bedrock.invoke_model(
   body=body_json,
   modelId="amazon.nova-canvas-v1:0",
   accept="application/json",
   contentType="application/json"
)

# Extract the images from the response.
response_body_json = json.loads(response.get("body").read())
images = response_body_json.get("images", [])

# Check for errors.
if response_body_json.get("error"):
   print(response_body_json.get("error"))

# Decode each image from Base64 and save as a PNG file.
for index, image_base64 in enumerate(images):
   image_bytes = base64.b64decode(image_base64)
   image_buffer = io.BytesIO(image_bytes)
   image = Image.open(image_buffer)
   image.save(f"image_{index}.png")

I get a very exciting result!

Matheus wearing AWS-branded hoodie

And just like that, I’m the proud wearer of an AWS-branded hoodie!

In addition to the "GARMENT" mask type, you can also use the "PROMPT" or "IMAGE" masks. With "PROMPT", you also provide the source and reference images, however, you provide a natural language prompt to specify which part of the source image you’d like to be replaced. This is similar to how the "INPAINTING" and "OUTPAINTING" tasks work in Nova Canvas. If you want to use your own image mask, then you choose the "IMAGE" mask type and provide a black-and-white image to be used as mask, where black indicates the pixels that you want to be replaced on the source image, and white the ones you want to preserve.

This capability is specifically useful for retailers. They can use it to help their customers make better purchasing decisions by seeing how products look before buying.

Using style options
I’ve always wondered what I would look like as an anime superhero. Previously, I could use Nova Canvas to manipulate an image of myself, but I would have to rely on my good prompt engineering skills to get it right. Now, Nova Canvas comes with pre-trained styles that you can apply to your images to get high-quality results that follow the artistic style of your choice. There are eight available styles including 3D animated family film, design sketch, flat vector illustration, graphic novel, maximalism, midcentury retro, photorealism, and soft digital painting.

Applying them is as straightforward as passing in an extra parameter to the Nova Canvas API. Let’s try an example.

I want to generate an image of an AWS superhero using the 3D animated family film style. To do this, I specify a taskType of "TEXT_IMAGE" and a textToImageParams object containing two parameters: text and style. The text parameter contains the prompt describing the image I want to create which in this case is “a superhero in a yellow outfit with a big AWS logo and a cape.” The style parameter specifies one of the predefined style values. I’m using "3D_ANIMATED_FAMILY_FILM" here, but you can find the full list in the Nova Canvas User Guide.

inference_params = {
   "taskType": "TEXT_IMAGE",
   "textToImageParams": {
      "text": "a superhero in a yellow outfit with a big AWS logo and a cape.",
      "style": "3D_ANIMATED_FAMILY_FILM",
   },
   "imageGenerationConfig": {
      "width": 1280,
      "height": 720,
      "seed": 321
   }
}

Then, I call the invoke API just as I did in the previous example. (The code has been omitted here for brevity.) And the result? Well, I’ll let you judge for yourself, but I have to say I’m quite pleased with the AWS superhero wearing my favorite color following the 3D animated family film style exactly as I envisioned.

What’s really cool is that I can keep my code and prompt exactly the same and only change the value of the style attribute to generate an image in a completely different style. Let’s try this out. I set style to PHOTOREALISM.

inference_params = { 
   "taskType": "TEXT_IMAGE", 
   "textToImageParams": { 
      "text": "a superhero in a yellow outfit with a big AWS logo and a cape.",
      "style": "PHOTOREALISM",
   },
   "imageGenerationConfig": {
      "width": 1280,
      "height": 720,
      "seed": 7
   }
}

And the result is impressive! A photorealistic superhero exactly as I described, which is a far departure from the previous generated cartoon and all it took was changing one line of code.

Things to know
Availability – Virtual try-on and style options are available in Amazon Nova Canvas in the US East (N. Virginia), Asia Pacific (Tokyo), and Europe (Ireland). Current users of Amazon Nova Canvas can immediately use these capabilities without migrating to a new model.

Pricing – See the Amazon Bedrock pricing page for details on costs.

For a preview of virtual try-on of garments, you can visit nova.amazon.com where you can upload an image of a person and a garment to visualize different clothing combinations.

If you are ready to get started, please check out the Nova Canvas User Guide or visit the AWS Console.

Matheus Guimaraes | @codingmatheus

from AWS News Blog https://ift.tt/HRSOE8h
via IFTTT